Construction of a frame house. Let's figure out how to build a frame house according to all the rules. Construction of wall frames
Today, frame construction is extremely popular in Russia, since such buildings are erected quickly and easily, and their cost is quite affordable. Many people build such houses on their own, so as not to resort to the services of professionals and save a lot of money.
To the question: “What technology frame construction is it preferable, Canadian, German or frame-frame?” - It’s difficult to answer unequivocally. However, experts are inclined to believe that the latter are best suited for DIY construction. The so-called half-timbered houses are built from frames formed by frame posts. The free space is filled with insulation and sheathed with finishing materials.
What do you need to know about frame construction?
Any construction begins with choosing a site, developing a project, and drawing up an estimate. First of all, you need to consider the purpose of the house: will it be a “summer option” for temporary residence or permanent housing for year-round use. Construction costs will depend on this. In both cases, various materials are used to insulate the walls, as well as their outer and interior decoration.
 An important advantage of such buildings is that a person has the opportunity to build a house in full accordance with his preferences. After all, you can choose any suitable one.
The peculiarities of building frame houses are that first a rigid frame of the house with a roof is constructed. After this, finishing begins with sheet material and. Further construction is also underway. If you take on the construction with your own hands, the construction of such a dwelling can be completed within six months.
When building a house using this technology, it is very important to take into account the expected time of residence there. Because if it is seasonal, then the house will have the same requirements, but if you plan to use the home all year round, then it must be carefully insulated. 
Construction technology: foundation
You can get by with one of the following:
Recesses are made in it with a diameter of about 20 centimeters and about a meter deep, at a distance of 0.8 m from each other.
Construction in stages: piping
The subfloor itself is usually made from unedged boards, the cheapest material.
But it must also be treated with means. The boards are fastened to them with nails, the logs are attached to the strapping with metal corners.
House in stages: mounting the frame
It is fixed with nails with large heads. Installation occurs at the very last stage. If the method of using the material used allows, then all activities can be carried out with your own hands.
House in stages: insulation and finishing
 There are many different materials used for exterior decoration. This is a simulator of timber, chipboard, etc. The final finishing is preceded by the installation of sheathing made of 50/40 beams, with a distance of 0.6 m between them. Metal profiles are successfully used for this purpose.
If the sheathing is wooden, then it must be treated with fire-fighting and antiseptic agents.
Then manual finishing is carried out in accordance with the technology of the material used for finishing.
In order for something built with your own hands to be warm and cozy, it must be
The final stage of work is the installation of all necessary communications and final finishing, the type of which depends on the preferences of the owner. Today's choice of finishing materials will satisfy the most biased taste. You can make any of your fantasies and projects come true. There would be a desire! Good luck in your construction.
Frame houses are very popular among developers. This is due to the fact that they are built in short terms and require a minimum Money, have excellent performance characteristics and are environmentally friendly.
If someone has a desire to start building just such a house, then in this article you can get information on how to do it. Here everything is described in stages. At the same time, it is meant that all preparatory, and most importantly, organizational measures have been carried out and permission to build a house has been obtained. What does that require?
The foundation is chosen at will and can be columnar, pile-screw, strip, etc. This article discusses an example of building a frame house with a pile-screw type of foundation.
This type of foundation is suitable for those areas where there is loose or unstable soil. This type of foundation has a number of advantages, such as:
- There is no need to use special equipment to build it.
- The foundation is erected in a short time: one day is enough to install it.
- Huge selection of building materials (piles).
- The foundation has excellent load-bearing characteristics.
- This is a cheap foundation option compared to other types of foundations.
- The foundation can be installed at any time of the year.
On a note! Availability pile-screw foundation does not allow you to equip a basement in the house. This is a significant drawback of this option.
How to calculate the number of piles?
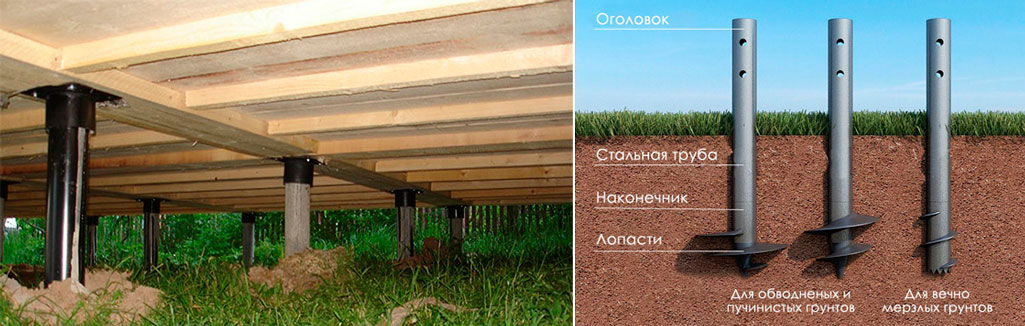
Piles must have the correct geometric shape and high-quality blades. You can select suitable piles from the corresponding table.
Screw pile (pipe diameter) Installation step Application
219
3-10
Houses, piers, hangars
159
2-5
Likewise
133
2-5
Likewise
108
2-5
Heavy gates, piers, hangars, houses, fences
89
2-4
Can be used as additional piles, for houses, outbuildings
76
1-3
Light buildings, terraces, signs, traffic signs
59
0.5-2
Likewise
On a note! In conditions where the soil is clayey, work should be carried out in dry, non-rainy weather. The piles are installed strictly vertically.

If thick piles are used, you will have to use special equipment. If you choose piles of the optimal diameter, you can get by with your own efforts. In this case, it is much easier to decide on the same level of installation of piles.
To begin with, the necessary markings are carried out on the site and the site is prepared. It is desirable that it be horizontally level and could serve as a kind of guide to the depth of immersion of the piles.
The next stage is determining the perimeter of the future foundation. To do this, metal rods are hammered into its corners, after which a rope is pulled between them. It is necessary to check that the future foundation has right angles.
First of all, the piles are installed in the corners to a depth of at least 0.5 meters. Although it all depends on the type of soil. It is better to install the piles by two people: one screws them in, and the second controls the verticality. Having installed the piles at the corners of the building, they begin to install intermediate piles, which can be located at a distance of 0.7-1.2 meters from one another. All piles are screwed in to the required depth, after which they begin to level them, concreting and installing the caps on the piles.

For this operation, beams measuring 150x150 mm, 200x200 mm and 200x250 mm are suitable. Before laying the beams, the tops of the piles are coated with mastic and a couple of layers of roofing felt are laid. This is the so-called waterproofing. The bars should be treated with an antiseptic.
The beams are mounted along the entire perimeter of the future building and connected to each other in half a tree using nails 120 mm long. All joints are reinforced with corners, which are fastened with nails 50-60 mm long.
The beams are attached to the base with screws; at the same time, they are placed in special heads and are well attracted by the screws.
A board is laid on top of the frame on the beams, which will cover the joints of the beams. The vertical posts of the future frame will be mounted on this board in the future. The board is nailed to the beam with nails 100-120 mm long.

The subfloor is mounted on logs measuring 100 by 150 mm, installed every 0.6 meters. The logs are connected to the frame using metal corners, after which a board is nailed on top of the logs.
Insulation is laid in the openings between the joists, and a vapor barrier film is spread on it. After this, everything is covered with plywood. Thick plywood is taken and it is attached to the joists. To ensure the floor is level, the logs must be installed in the same horizontal plane.

To install the frame, beams of the following sizes are taken: 100x50 mm, 150x50 mm, 200x50 mm. First of all, vertical posts are installed at the corners of the structure. They are fastened securely using reinforced metal corners. After this, proceed to the installation of the remaining racks, which are attached similarly to the corner racks. All racks are equipped with jibs that minimize loosening of the structure.

The upper beam is connected at the corners by means of cutting, and to other vertical posts using corners. For greater strength, diagonal slopes are installed.

Their installation can be done in three ways:
- Through cutting.
- Using perforated brackets.
- Using metal corners.
Alternatively, it is recommended to combine several methods at the same time. This may be the option of cutting down or the option of using corners. The beams are installed directly on the beam of the upper frame. Fastening can be done with self-tapping screws, but it is better to use nails, since they allow the wood to expand freely when humidity changes.

Installing a roof is a fairly labor-intensive operation that deserves to be described in a separate article.

For this purpose, a wide range of facing materials is available for sale, such as siding, timber simulator, artificial stone, etc. The work is carried out in the following order:
- At the first stage, a lathing made of wooden beams measuring 40x50 mm is installed. The sheathing pitch is 0.6 m. As an option, a CD-60 metal profile from plasterboard systems will be used.
- If the sheathing is made of wood, then it is advisable to cover it with an antiseptic and fire-resistant material.
- After the sheathing is ready, installation of the facing material begins.

During the work process, one should not forget about the insulation of a residential building. As a rule, everything is subject to insulation: floor, roof and walls. Don't forget about the vapor barrier film.

The building is almost ready, all that remains is to complete the interior decoration of the living space. There are many options here, especially since each room requires its own approach. And rooms such as the bathroom and kitchen are subject to exceptional types of finishing.
Photo report of building a frame house on your own
Here you can see step by step the construction of a frame house with your own hands on weekends.

Construction frame houses came to us from abroad. These easily erected structures are the basis for the construction of country houses and cottages in Scandinavia and a number of European countries. The basis of the construction technology is assembled frames made of wood or metal profiles; mineral wool and basalt insulation are used for insulation. The wall takes on a finished look after it is covered with various slabs, for example, DSP. The final coating is already applied to these slabs.
Which frame to choose - metal or wood?
As a material for the frame, new dried timber of various sections, made of coniferous trees, is used.

Undoubtedly, wood has a number of properties that give it advantages over stone and metal - this is the ability to breathe, and much more. But at the same time, wood has disadvantages; without appropriate treatment, it is prone to the appearance of fungus or mold; in addition, if a number of conditions are met, the possibility of the appearance of strains of harmful microorganisms arises.
All of these factors lead to the fact that some developers prefer frame structures made of metal. The metal profile has a zinc coating, which can guarantee long-term protection against corrosion. In addition, the necessary perforation has already been prepared on the metal profile for frame house construction.
The difference between frame housing construction and environmental friendliness. Only natural wood and the possibility of using natural insulation.
In addition, a frame house can be built without the help of a large team.
Now it is believed that a frame-panel house can only be a country house. However, the experience of many European countries, for example, Swedish or German technology, tells us about the successful possibility of using a frame house in winter and summer for. Reviews also confirm this.
So, let's start building a house with step-by-step instructions, step by step instructions. We hope they help you.
Preparatory work

Buying a frame house is not difficult; you just need to contact a specialized company that sells such products or, having developed a project yourself, build your own home. The order of construction work can be displayed in the following list:
- Research;
- Design;
- Construction of the foundation;
- Construction of a box, roof;
- Insulation, finishing work and arrangement of engineering systems.
At the first two stages, the possibility of building a house in this place is clarified. If this is possible, then the type of foundation and its design are determined. As a result of this work, a specification and estimate appear, which contains a list of materials and tools, their estimated cost. Before starting all this preparatory work, the developer must draw up technical task for a future home.
Laying a columnar foundation

Depending on the condition of the soil and the mass of the future house, the developer determines the type of foundation. Practice shows that any type of foundation can be used - a foundation on screw piles, or columnar. During construction columnar foundation It is necessary to have at least an approximate drawing of the location of the walls on hand.
The essence of this foundation is that the pillars will be placed in the corners of the building and in places of maximum load on the structure. For this type of foundation, concrete and brick are used.
Before starting work, it is necessary to mark the location of the pillars.
After it has been carried out and quality checked, you can begin to manufacture the pillars themselves. For this, you can use separate formwork, or you can arrange their production directly on the site.

The first step is to make a pole support, it is called a shoe. Look at the photo, it shows a schematic diagram of a pile with a shoe. Its dimensions are up to 30 cm in height and 25–30 cm in cross-section. Its design includes a reinforcing mesh, which is located parallel to the surface of the earth; several vertical reinforcing bars can be installed - they will serve as the basis for the pillar. After the shoe has hardened, the main part of the foundation column can be made. To do this, you can use either a piece of pipe or build a wooden formwork. The height of the entire structure is equal to the sum of two terms - the depth of the hole (freezing height) and the amount of the column extending above the ground (from 100 mm).
Some experts use traditional M300 grade concrete as a material, while others use sand concrete. In fact, the type of concrete used must be determined at the calculation stage. The main thing to remember is that the material for making the shoe and the base must be the same. To carry out further work, it is necessary to allow the finished parts to dry. This process will take at least 7 days, but using bricks or cinder blocks will speed up the drying process by several days.
Once the pillars are ready, you can begin installing them. To do this, you will need a hole drill, which will allow you to dig a hole under the post. The size of the hole must exceed the size of the shoe. The installation of pillars is carried out in strict accordance with the markings of the foundation. The pillars are installed at a distance of 1–2 m from each other in places of greatest load, for example, under a heating boiler. After installing the pillars, the space between them and the walls of the pit can be filled with crushed stone and sand.
Construction of wall frames
Grillage - platform for the home

Completion of the foundation construction allows work to begin on the construction of the main load-bearing structures. The basis of the walls and everything else in a frame house is the grillage. Is it wooden or metal structure, which is laid on foundation pillars protruding from the ground. Along its contour, the grillage follows the outline of the future house. When laying it, it is imperative to use measuring instruments that allow you to control its horizontalness. The dimensions of the timber or metal profile are determined by the weight of the building structure being erected.
Construction of a wall frame

After installing the grillage, you can begin installing the wall frame. For this, you can use timber with section dimensions of 150x50 or more. The timber must be made from coniferous trees and dried to a moisture content of 12–18%. In addition, we must remember that all wooden structures must be treated protective equipment from mold, mildew and fire.
The wall frame can be assembled nearby on a flat piece of land; when assembling the frame, it is necessary to immediately prepare window and door openings. The finished frame of one wall can be installed on a grillage and secured with jibs. As with all assembly operations, builders must use a measuring tool to install wall frames in strict plane orientation.
House roof installation

Creating a roof is one of the most important points when building a house using frame technology. Errors that occur during its construction lead to deformation of the roof and violation of the thermal insulation regime. As a result, its destruction may occur. The ceiling is responsible for solving several problems, namely:
- Hanging a ceiling covering on it;
- Insulation retention.
If the developer provides for the presence of a second floor or, then the ceiling must be reinforced. Depending on the load that the ceiling will take on, the cross-sectional size of the ceiling beam is selected. For example, if the useful and non-residential load is 147 kg per square centimeter, then it is necessary to use beams with a section of 150 * 50 m with a pitch of 400 mm between them.
The process of installing joists and rafters for them is no different from the process carried out during the construction of a traditional house.
That is, after marking, the logs are nailed to the top plank of the wall frame in a vertical position.
In order to secure the lag, it is enough to use three nails, two are driven in on one side, and one on the other, at both ends.
Rafters can be assembled on a flat area construction site and after assembling them and checking their correctness, lift them up. The assembly of the roof begins with one of the facades; the use of a plumb line is mandatory. Having placed the first rafter, it is necessary to fix it with jibs, and after installing the second, it is advisable to tie the installed structures together. In addition to the fact that the rafters are connected to each other, to increase the strength of the structure, it makes sense to connect the rafters and joists using a vertically lowered board. This is how the rafters are installed sequentially.
The installation of sheathing is also no different from such an operation carried out when erecting a roof on a regular house. Laying of hydro- and thermal insulation is carried out in accordance with the instructions supplied with this product. Both artificial and natural materials are used as thermal insulation materials. To reduce the weight of the structure, it is advisable to use polystyrene foam, which is produced in sheets of different thicknesses.
Another positive property of a frame house is that all finishing work can be carried out without waiting for it to shrink. You can begin to carry them out immediately after the openings are in place and the wall frame itself is sheathed with slabs. Then the developer can begin finishing the walls inside and out.
Interior work in the house

The material that is used to cover the walls from the inside, and this can be DSP or its analogues, allows you to apply almost any type of material to its surface. finishing material– wallpaper, tiles and others. It all depends on the choice of the developer and the interior design of the future premises.
Exterior works
With work on finishing the house outside, the situation is somewhat more complicated. Depending on the climate zone in which the frame house is built, additional insulation may be required. For these works you will need insulation, waterproofing film, as well as wooden beam or galvanized metal profile to create sheathing. To insulate the walls, a sheathing made of wooden beams or metal profiles is installed on them.
The dimensions of the sheathing must correspond to the dimensions of the insulation that will be laid in it. Some experts recommend laying a layer of waterproofing film on top of the insulation. If the task is to create a ventilated facade, then it is necessary to attach smaller beams to the vertical beams of the installed sheathing, and the siding will be attached to them. The created space will serve for natural ventilation and prevent excess moisture from accumulating.
How much does it cost to build a house
The experience of erecting a frame house by those who rely only on their own strength shows that the entire cycle of work from building the foundation to the start of finishing, with proper organization of labor, no interruptions in materials and the presence of one or two assistants, can take three to four months.
Building a house with your own hands is profitable and economic point vision. By purchasing a finished structure, the developer pays for the project, Construction Materials, in addition, the labor of builders and installers, by the way, who will erect the house in approximately the same time frame, is paid. The project price ranges from 5-50,000 rubles. If you buy finished project at home, it will cost about 15,000 rubles, and if you order individual project at home with an architect, it will cost 30,000 - 50,000 rubles. Nowadays, many architectural studios work remotely, so even if they are in Biysk, they will be able to design your dream home project. In other words, at a cost finished house and the work on its construction is approximately 1.5 million rubles, you need to understand that this figure depends on the region and the configuration; construction on your own will cost twice as much. For example, some companies offer their clients country houses at a price from 1,115,000 rubles to 1,824,000, and dachas - within 300,000 rubles.
If you are not ready to build a house or you don’t have the opportunity, then order a turnkey house using Canadian, Scandinavian or Finnish technologies.
Video
Watch a video about building a frame house with your own hands.
Prefabricated buildings have already won their place in the sun in the housing market. Warm, light, luxurious, they have two significant advantages in conditions of constant crisis - reasonable cost and the possibility of independent construction. To build a frame house with your own hands, you need to step by step understand the essence of the technology so that the object meets all the requirements for safety and comfort.
The principle of frame construction
As the name suggests, the object is built on a wooden frame. The walls consist of numerous stiffening ribs and insulation. Finish coating – panels, slabs. The advantages of a frame house are increased heat capacity, lightness and reasonable cost, especially for young families.

Before construction begins, it is necessary to obtain professional project, because frame technology structurally complex. Drawings and plans are verified according to studies of the site, soil and area as a whole - the future facility must meet increased safety. This is the only point that should only be dealt with by specialists.
In addition, the received document must be agreed upon with the utility services whose resources pass through the site, and registered with the BTI or a similar city office. Unfortunately, it is impossible to do without bureaucratic delays.
When all the necessary paperwork is completed, the construction stages begin.
Frame house foundation
It is impossible to deviate from the type of platform designated by the project - sometimes a poured base is required. But, as a rule, for a frame house they choose piles or steel, the pillars are reinforced concrete or self-assembled from brick.
Operating procedure:
- The area is cleared of vegetation with special care. Plants are uprooted and the root system is sprayed with chemicals in order to stop future growth - plant moisture is detrimental to the wooden frame. The soil is leveled and compacted.
- Marking. It consists of setting the perimeter according to the project and marks for installing piles or pillars. To do this, stakes with a stretched cord are installed in the corners. The pitch between the supports is from 0.7 to 1.2 m, depending on the dimensions of the residential building. The racks must be located under the load-bearing walls of the house.
- Installation of piles or pillars. For the first option, digging holes is not required. It is enough to set the piles at right angles to the ground and screw them to a depth greater than the freezing level - the length is selected in advance. The work is done independently or with the help of equipment. The second option of supports requires depressions in the ground, their depreciation, reinforcement and filling. They also work with bricks.
Harness
The lower beam must be of an impressive cross-section - from 150 mm, since it will bear the entire load of the object. Before laying, all wood is impregnated with antiseptic agents, and the heads of piles or pillars are waterproofed with mastic and covered with roofing felt.

Installation of timber around the perimeter is carried out by cutting down half a tree. Fixation and reinforcement - with nails and steel corners. The wooden beam is attached to the base with screws or anchor bolts - special grooves are provided in the piles for this.
The foundation is almost ready. A larch board is laid on top of the wooden beam - this species is generally insensitive to natural phenomena - precipitation, freezing, cracking - and will reliably protect the top wood.
Maintaining walls
The corner posts are installed first. Their standard size is indicated in the project - the timber for one floor should not be less than 100 mm in cross-section. They are secured with steel angles, the cutting method, and anchor bolts. Then stiffening ribs are installed - boards up to 5 cm thick. For their reliable fixation, each element is equipped with a jib - a diagonal strip.

Places for technological openings - windows and doors - are equipped immediately, since a frame house gives little shrinkage, unlike log and lumber objects. To do this, shortened racks are mounted under the windows and a box is immediately installed for inserting future windows.
According to the project, the internal walls are built immediately in the same way as the external ones - racks, jibs. To save material and if the house is planned to be built on one floor, use timber or boards of a smaller cross-section. Otherwise, it is impossible to deviate from the overall project.
Install the upper trim beam. This is an equally important design, so a beam similar to the bottom trim is used for it and the lumber is fixed with a notch, corners, brackets, and self-tapping screws. For greater reliability, the methods are combined.
Construction of a gable roof
The roof is laid out in the same way as the walls. Of course, construction is not carried out alone, however, and does not require a large number of assistants. A couple of people will get by on their own.
The roof construction stage requires a separate description, since it includes a large amount of information. You can find the construction process in the article:.
Exterior finishing
When the frame has received visible outlines, it needs protection from natural precipitation - wood is sensitive to moisture - insulation and exterior decoration. The roofing material is laid first. It is chosen depending on the type of roof and the angle of inclination of the slope - flat ones require smoothness, steep ones - structural coverings are possible.
A variety of raw materials are used for work - siding, block house, fiber cement panels, lining. The materials are united by ease of installation - all units have locking grooves and ridges. Installation is carried out from below, and finally the house is decorated with corners, slopes, ebbs and other fittings.

Waterproofing and wind protection are laid on the walls and vertical sheathing is installed - wooden house As many ventilation ducts as possible are required to prolong the life of the wood. detailed instructions installation of siding is included in the construction materials, so there should not be any difficulties.
Insulation and protection
Walls require special treatment. After finishing, it is important to protect them with a cake consisting of several layers in this order - the insulation itself, the vapor barrier and the finishing coating.

There is no need to hesitate - it is important to carry out the work quickly in order to avoid damage to the material, if it is traditional to use basalt wool for the main layer. It is dense, voluminous, not subject to burning and deterioration. However, it has a serious drawback - caking even from a small portion of condensate.

Therefore, if construction is delayed, it is worth considering other types of insulation:
- Expanded polystyrene boards. The air enclosed in the shell is securely retained by the 5-cm thickness similarly brickwork 30 cm. Disadvantage - it does not burn, but smolders, releasing toxic fumes into the atmosphere. The advantages, in addition to high heat capacity, are absolute inertness to moisture and durability.
- Sprayed extruded polystyrene foam. Reliably closes all joints and cracks. Only performed by professionals as automatic installation is required.
- Ecowool. Absolutely pure environmental material, applied with special devices similar to polystyrene. The disadvantage is the high price.
The time for interior decoration will come last. A frame house accepts any interior and materials for decorating walls, ceilings and floors. Creating a unique interior look of your own home is always interesting, so there is no need to rush.
Video on how to build a frame house with your own hands step by step
-
 April 17, 2015Debit cards When will Sberbank visa work with apple pay
 -
 April 17, 2015Help for B&B cardholders


