Building a foundation for a small barn with your own hands. How to build a barn: detailed step-by-step instructions with a photo. Foundation for a barn - savings and practicality
The barn is necessary and indispensable for personal plot, in the country. A wide selection of tools and materials in the trading network allows you to professional builder to erect an outbuilding. And you need to start with a solid foundation. There are quite interesting options for how to make a foundation for a barn with your own hands.
When constructing a foundation for a barn, it is necessary to take into account the type and properties of the soil on which it will stand. Proper soil analysis will allow you to choose the best option for the foundation itself.
Types of soils for placing light shed-type buildings:
- rocky;
- sandy;
- clayey;
- gravel;
- loams;
- sandy loam.
Shed needed on site
Despite the fact that the barn is considered a light building, the most preferable for its construction is rocky soil in the form of a continuous array without cracks and voids. Such properties of rocky soil as the absence of subsidence, freezing in winter, quicksand provide rigid stability of the foundation and the entire structure as a whole.
However modern technologies laying the foundations allows no less successful construction on sandy, clay, gravel soils, as well as on loam and sandy loam. The problem of these places is that frosty heaving, quicksand, significant compression and subsidence of the soil can appear here.
Attention! In regions with frosty winters, clay soil saturated with groundwater freezes and significantly increases in volume (swells). This leads to a rupture of the foundation!
Heaving is manifested both under the base of the foundation and from the sides. There are several options for protecting the foundation for a barn on heaving soils:
- excavation of heaving soil at the site of the future structure and its replacement with coarse sand, crushed stone;
- laying the foundation for a barn to a depth below the freezing point;
- insulation and waterproofing of the base of the foundation and sides;
- monolithic foundation.
Quicksand, soils with organic impurities and bulk are considered unsuitable for all types of construction.
Mortar for pouring the foundation under the barn
A solid foundation for a barn ensures the durability and reliable operation of an outbuilding. Therefore, it is necessary to carefully and scrupulously select the components of the solution for pouring the foundation:
- you can buy ordinary Portland cement, but always with a fresh date of manufacture;
- it is better to purchase crushed stone in a mixture with a finer fraction - the solution fits more densely, when solidified it will become more monolithic, cement consumption will be reduced;
- sand and gravel must be free of debris and impurities;
- it is better to use fresh clean water.
Important! For mortar, cement is mixed with sand and gravel in a ratio of 1:3:5, water is poured in portions until a thick, well-mixed mass is formed.
Types of foundations for a barn
Modern technologies allow you to choose the type of foundation depending on the type of soil, resistance to various influences (groundwater, acidic soils, soil freezing), financial capabilities. This section provides five of the most commonly used DIY barn foundation options available to homeowners. land plots average income both in terms of the list of necessary materials, and in terms of their cost.
Strip foundation for a shed
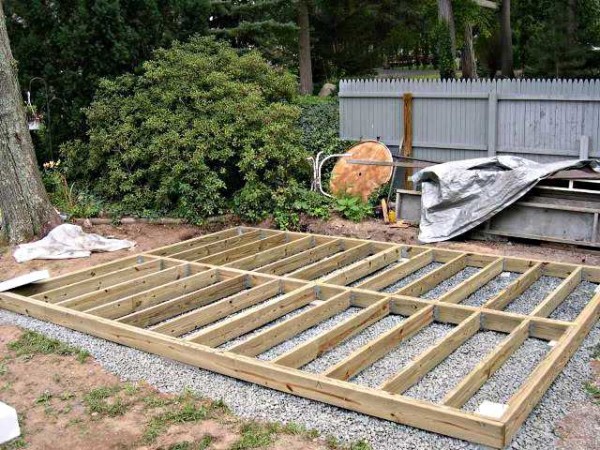
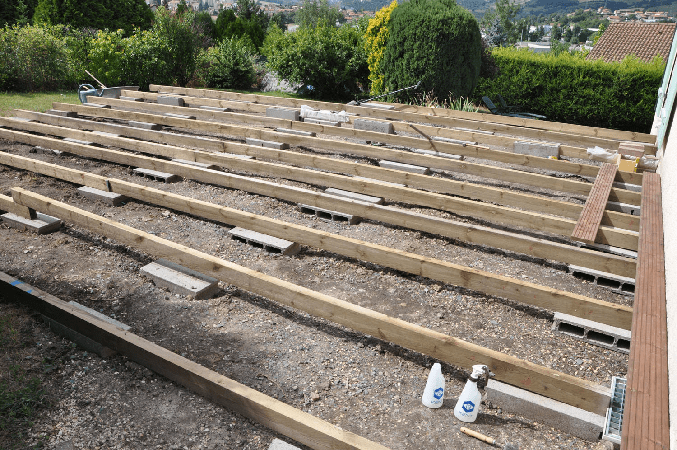
This type of foundation is the most versatile in relation to the type of soil, it is characterized by strength and the possibility of building a basement. The first stage is digging a trench. They start by marking the site and installing pegs around the perimeter of the future barn, and string is pulled between them.
 Strip foundation for a barn
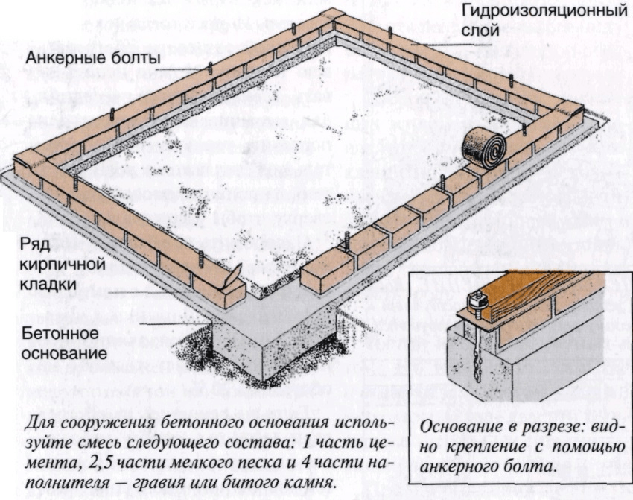
Calculation of the trench parameters: the depth of the ditch is the sum of the freezing depth of the soil layer in the area and an additional 15 cm (for example, 70 cm + 15 cm = 85 cm), the width is taken about 70 cm, while the width of the finished foundation is recommended to be 40 cm. Bottom the trenches are filled with a layer of crushed stone of about 10 cm and a layer of sand of about 5 cm. This pillow must be rammed. If groundwater protrudes when laying a trench, it is necessary to carry out additional work on drainage and waterproofing of the future foundation. The next stage is the installation of a wooden formwork protruding 20-30 cm above ground level. The most common wooden formwork from a board is 15x4 cm. The foundation is reinforced with a reinforcing mesh with a cell diameter of 30 cm and a reinforcement cross section of 1.2 cm. . Ends the filling process concrete mortar.
Important! To give the foundation for the barn the necessary solidity and strength, you need to fill it in one day without interruption and tamp it well.
It is also important to remember that concrete hardens within a few days and during the hot time of the day it must be periodically watered to prevent cracking.
After the final solidification, the formwork is removed, the gaps between the foundation and the walls of the trench are filled with soil, and, if necessary, waterproofing and insulating materials are laid.
Column foundation for a barn
This is a simple foundation for a barn, a more economical option, and its implementation is available to an ordinary homeowner with little or no outside help and equipment. There is no need to dig a trench, as the foundation rests only on a few pillars dug into the ground. The column foundation option must be carefully chosen for use on moving soils, but it will perfectly fit with the not very even surface of the area selected for the barn. The place for the construction must be cleared, if possible, leveled.
 Column foundation for a barn
Clay soil is best covered with gravel. The calculation of the depth of digging in of the support pillars is also carried out taking into account the depth of freezing of the soil in the area plus an additional 15 cm. Concrete or brick supports are placed at the corners of the future foundation for the barn and at the joints of the walls. As in the first variant, a two-layer pillow of crushed stone and sand with obligatory compaction is laid at the bottom of each hole, a metal rod is placed in the center to reinforce the structure.
If the soil is mobile, loose, a reinforced concrete base can be laid on the bottom to prevent the shed from sinking. The rest of the space in the pits will be occupied by the laying of pillars. You can use brick, concrete blocks, asbestos pipes filled with concrete inside. brickwork must be coated with waterproofing mastic, for example, bituminous. The junction of the foundation and the walls of the barn is also laid with waterproofing materials, especially if a plank shed is planned.
By the way, for a wooden light outbuilding, the supporting posts can also be made of wood. To protect against moisture, they need to be burned or impregnated. by special means. Such a barn will be inexpensive and environmentally friendly. It is convenient to keep poultry or store light gardening tools in it.
Foundation for a barn from foam blocks
Foam blocks are durable, lightweight and relatively inexpensive material. It is easy to install and does not require special knowledge when building on your own. It is used not only for the foundation, but also for walls, providing less load on the ground from the erected structure. The construction of the foundation for the barn begins with the laying of a trench or foundation pit, if necessary, equipment for the basement.
The calculation of the depth is the same, and the width will be the thickness of the foam block and an additional 15-20 cm. The bottom of the trench (pit) is covered with a two-layer cushion of crushed stone and sand, on which formwork with a reinforcement frame is placed. Concrete is poured from above with a layer of 20 cm. After it hardens, foam blocks are installed.
block foundation
The foundation for a barn made of blocks distinguishes long term operation, resistance to freezing and the effects of acidic soils, affordability and range, ease of installation and reduction of time for building a foundation for a barn with your own hands.
The technique of laying blocks in a trench differs from the installation of foam blocks in that the blocks are laid directly on the concrete solution. It is better to play it safe by installing a frame made of reinforcement. It is also very important to control the level of stacking blocks from the first moment. Installation begins with the corner points of the future structure. External seams are filled with a solution with the addition of moisture protective agents. The outer surfaces of the foundation are wrapped with waterproofing materials, after which the trench can be buried. The foundation for the block shed is ready!
Monolithic foundation
 Monolithic foundation for a barn
A monolithic foundation will require several large financial investments, but this fact is offset by a number of advantages. Since it rests on the ground with its entire surface and can withstand significant loads, a shallow pit can be dispensed with. The foundation will serve as a floor in the barn at the same time, on which it is convenient to put any coating. A monolithic foundation, due to its strength and stability, will last so long that it will be possible to build the next barn on it. Such a foundation is impregnable for attack from outside. frosty heaving or moving soils.
Attention! A monolithic foundation requires high grade cement and high quality consumables.
It is better to remove the soil under the foundation and fill it with sand or gravel with a layer of 20 cm. The pillow is moistened and carefully rammed. The next stage is the laying of waterproofing, and, if necessary, insulation. Then 10 cm of mortar with large gravel. Reinforcement with a section of 16 mm is laid out on it in the form of a grid with cells of 20 cm and another 10 cm of concrete on top.
It is much easier to build a foundation for a barn than for a house, because its weight and area are much smaller, and often it is not heated. However, here you need to know some points so that the outbuilding does not collapse and rot in a few years. On what basis can a barn be placed and in what cases can one do without a foundation at all?
barn without foundation

A foundation can be dispensed with if the building is very light, wooden or OSB, or a metal container. For a small barn, the construction of a powerful foundation is not justified either economically or in terms of strength.
A barn without a foundation can be made with your own hands from a metal container. This option is attractive for many reasons. Such a shed can simply be placed on sleepers, wooden beams or concrete blocks, between which crushed stone is poured.
You can make a frame barn without a foundation. Before construction, the land at the site of the future utility block is cleared and covered with gravel. Then the racks, pre-treated to prevent rotting, are buried 60-80 cm into the ground and concreted. In this way, it is possible to build a barn from boards with a shed or gable roof. To do this, four wooden poles 3 m long are dug into the ground. For a shed shed, two of the poles are made 10-20 cm lower.
Types of foundation for a barn

The barn can be placed on the foundation of the same type as the house. But due to the small weight and size of the building, you can also find more exotic options, for example, from tires or sleepers, they also have their advantages.
The type of foundation should be chosen based on the type of soil, as well as the design and purpose of the building. For a barn in which animals or birds are kept, a different foundation is needed than for a woodcutter. The cost of materials also matters: it makes no sense to make a foundation for a barn, which is several times more expensive than the utility block itself.

Strip foundation
It is suitable for solid structures such as brick and foam block sheds, for example, in which livestock are kept. Wood is not suitable for the construction of such sheds: it rots, collapses during cleaning, such a structure cannot be called durable. For frame and plank sheds, such a foundation is not economically justified, it will come out much more expensive than the building itself and will have excessive strength, which is not needed in these cases.
The trench is dug no deeper than half a meter. It can be either prefabricated from blocks or monolithic. The second option is suitable for more powerful designs. The advantage of this type is its versatility. A shallow strip foundation can be made on sand, clay, rocky soil. How to make such a foundation for a barn with your own hands?

- They dig a trench about 50 cm deep, 30 cm wide more than the width of the future tape.
- A layer of crushed stone (10 cm) and sand (5 cm) is poured at the bottom. Each layer is well rammed.
- In the trench, formwork is installed from boards 30 cm high above ground level.
- Reinforcement is placed inside - mesh or rods.
- Concrete is poured into the formwork. After it hardens, the formwork is removed, the tape is coated with waterproofing and the gaps between the tape and the walls of the trench are covered with earth.
Monolithic belt
This is a cheaper version of the strip foundation, suitable for a poultry house or barn. It allows you to make a floor on the ground, suitable for non-porous or clay soils. In the first case, only with highly located groundwater will it be necessary to make waterproofing and drainage. On clay soils, waterproofing of concrete, insulation of blind areas and the perimeter of the building, and wall drainage are needed.
After marking the site, the fertile layer of the earth is removed, then a gravel, sand or mixed pillow is poured 0.2 m larger than the foundation on each side. Drainage pipes are placed in trenches dug around the perimeter in the form of a closed loop with a slope of 4 degrees.
If the soil is clayey, then the perimeter must be laid out with polystyrene foam, and the blind area must also be insulated at a depth of 40 cm.
Next, formwork is made from boards, reinforcement is placed in it from rods with a thickness of 6-10 mm. The concrete is then poured and compacted with a vibrator. After the formwork is removed, the concrete is coated with bitumen, mastic or waterproofed with rolled materials.

The floor is poured into the finished base on the ground, it is separated from the foundation with a damper tape.
Block foundation
Such a base for a barn is made by laying blocks in a trench. They are placed on a concrete mortar, the outer seams are made with a solution with moisture-proof additives. The laid foundation is waterproofed from all sides. After that, the trench is buried.
You can use cinder blocks. Their disadvantage is the porous structure, due to which they are quickly destroyed by moisture. Therefore, such a base must be carefully waterproofed.

Foam block foundation
The foundation for the barn can be made of foam blocks. They are laid in a trench or pit, but a concrete pad is first made. To do this, a pillow of crushed stone and sand is poured into the bottom of the trench. A formwork is installed on top, in which reinforcement is placed, and a concrete pad 20 cm thick is poured. Foam concrete blocks are laid on the hardened concrete.
The width of the trench is the width of the block plus 15-20 cm, the depth is equal to the depth of soil freezing plus 15 cm.

Columnar
A simple foundation for a barn is obtained from concrete, brick or wooden posts. It does not require alignment of small height differences, it requires less material than for tape. It should not be placed on moving soils - over time, the columns may bend or move apart, which will entail the collapse of the entire structure.

For a columnar foundation, it is necessary to dig holes in which the columns will be placed. Pits need to be dug 15 cm deeper than the freezing level of the soil. A pillow of crushed stone and sand is poured at the bottom, well tamped. A metal rod is placed in the middle. The foundation columns for the barn are laid out from concrete blocks, bricks, asbestos-cement pipes can be used, into which concrete is poured. On loose soils, a reinforced concrete base is poured to the bottom of the pits so that over time the building does not sink. For brick columns, a thickness of one and a half bricks is enough. The interior cavity is filled with concrete. brick pillars it is necessary to waterproof - coat with bitumen or mastic. The joints of the foundation and the barn itself are also necessarily waterproofed, especially if the hozblok is wooden.
If pipes are used as formwork for posts, they should be reinforced from the inside with reinforcement. Small crushed stone or pebbles must be added to the concrete. After the concrete has hardened, the columns are coated with waterproofing materials.

If concrete blocks are used, then their masonry directly depends on the size. A large block can play the role of a whole pillar.
If the soil is rocky or is coarse, gravelly sand, then the columns can not be deepened much - it will be enough to deepen 2 rows of bricks or 1 row of blocks. Then the first beam of the structure will play the role of a grillage.
From wall blocks 20 * 40 * 40, you can make a kind of columnar base on non-rocky soil. On clay soil, it will be necessary to insulate the entire perimeter of the building and make wall drainage or bury the pillars below the freezing level. In this case, the cost of the foundation will increase significantly, so it is better to do it on rocky or gravelly soil.

- Under each column, a fertile layer is removed (about 40 cm).
- A pillow is poured, sandy (for dry soils) or crushed stone (for wet soils), its thickness should be 20-40 cm. After pouring every 10 cm, the pillow is rammed.
- Along the perimeter of the base, drainage is made from perforated pipes.
- Next, lay out the columns of the blocks.

foundation from screw piles well proved on heaving, loose and other difficult soils. It is easy enough to make it yourself, you just need to buy piles and screw them into the ground using a crowbar or a pipe inserted into a special hole on the top of the pile. Two people are enough to drive the pile, no equipment is required. It is desirable that the third participant monitors the verticality of the support.
Another option is bored piles. Such a foundation can be built by drilling the required number of wells in the ground and inserting asbestos-cement or polyethylene pipes. Also, formwork for pipes can be made from roofing material rolled into a tube, while the seam is glued with bituminous mastic. The pipes are filled by a third with concrete mortar, the reinforcement is lowered and filled to the end. Rebar for bored piles is knitted from 4 corrugated rods connected by round or rectangular clamps, as in the figure. Such a foundation is good on clay or sandy loamy soil.

Tire foundation
A foundation based on used tires (better than large ones, from trucks) can be quite reliable. Tire columns are filled with soil or poured with concrete.
On heaving soil, tires are placed in pits dug below the freezing level at the corners and along the walls in increments of 1.5-2 m, filled with crushed stone, which is rammed, then covered with sand.

The disadvantage of a tire base is the large size of the wheels, which makes it difficult to make a pick-up to protect against moisture and rodents, so an imitation of a base is usually made for a barn. The advantage of tires is their elasticity, which decreases after concrete hardens, so the first method (with crushed stone falling asleep) is more preferable. The video shows the process of building a frame barn based on tires.
Sleeper foundation
Concrete or wooden railway sleepers play the role of a grillage when building a foundation. The disadvantage of this type of foundation is that sleepers are not always available, so it can be recommended to those who already have this material. It is also possible to build a strip foundation from reinforced concrete sleepers, laying them in a trench prepared, as for a conventional strip foundation. The sleepers are laid in several layers with dressing (the joint of each next row should be above the whole sleeper in the previous one).

Conclusion
The light weight of outbuildings allows you to make foundations of various types for them, including using unusual materials. However, in order to obtain a quality foundation, it is also necessary to follow the construction technology, as in the construction of a foundation for a house.
- Foundation "Swedish plate"
- Types of piles for the foundation
- How to calculate the amount of concrete for the foundation
- Driven pile foundation
The device of the foundation is one of the most important construction stages. The carrier platform largely determines the durability and scale capital facilities and small outbuildings. The barn cannot be attributed to demanding objects in terms of the characteristics of the foundation, however, in the technique of its construction there are many important nuances. Moreover, this operation in most cases is carried out with a modest set of materials and technical means, which in itself forces the performers to look for ways to optimize work activities. To arrange a high-quality foundation for a barn, it will not be superfluous to use proven technologies for solving such problems at minimal cost.

Preparation for work activities
Before starting the construction of the foundation, it is necessary to carefully calculate the work plan. It is important to determine the place of construction of the object, the area and orientation of technological points. An approximate layout of the shed will allow you to perform the correct positioning of the carrier platform, regardless of what technology it will be performed on. In order for the foundation for the barn to last longer and not be damaged due to defects in the ground surface at the very first stages of operation, it is important to clear the soil. The layer of vegetation must be eliminated and, if possible, the rough coating should be made not only even, but also rigid. This may also require the removal of a loose layer of soil or the use of a tamping tool. How to achieve the desired characteristics of the base surface will depend on the quality of the soil itself.

Solution preparation
Almost all barn foundation methods require the use of concrete. To prepare the mortar, you will need a basic set of water, sand and cement, but with the addition of gravel. The fraction of its elements can be any, but it is desirable to correlate it with the volume of the planned mass - the larger the pouring area, the larger the fraction. For example, gravel for a column foundation will have minimum size, and for the tape, it is desirable to select a large fraction. It is also important to observe the proportions for the solution from which the foundation for the barn will be made. With your own hands, in a small container, mix sand with gravel in a ratio of 3: 5, then add 1 part of Portland cement. Water is added with the expectation of obtaining a thick but tenacious mass.
The device of a monolithic foundation

This is a simple technique, but a fairly voluminous way to make a foundation. Its use is justified when it comes to the construction of a brick outbuilding. The essence of the technology lies in the construction of a solid sand cushion with the inclusion of the same gravel. Approximately 10-15 cm, a foundation should be laid, on which a cement screed will be organized in the future. But before that, a continuous formwork is formed around the perimeter of the working area, on which it is planned to install the foundation for the barn. Do-it-yourself restrictive barriers are made, within which the cement mortar will be poured. They can be made from plastic or wooden slats with panels - the main thing is that they can hold the poured mass. After that, you can proceed to the installation of reinforcing bars and the direct screed device. It should be borne in mind that the full acquisition of the strength of such a foundation may take about 2-3 weeks, depending on the working area.
How to make a foundation for a columnar barn?
The columnar foundation requires fewer materials in terms of volume, but its implementation implies a more thorough calculation. Usually, a carrier base is formed, fixed on racks fixed in the ground. If we are talking about a small barn, then four pillars with a diameter of about 15 cm are quite enough. For each of them, a hole is initially dug into which a pillow of gravel and sand is poured. Next, the column rod is installed and poured with cement. If necessary, you can use special equipment for driving piles. After that, the columnar foundation for the barn is covered with logs. The basis for the flooring will be formed by fastening structures, including grillage trim, channel and profile elements.

Strip Foundation Device Technique
This type of foundation is one of the most common in the construction of residential private houses, but for outbuildings it is considered too troublesome and unreasonably expensive. To implement this technique, it is necessary to make excavation lines around the perimeter of the working site. You will get trenches that are covered with sand and gravel. For greater reliability, a reinforcing base is also carried out in earthen niches. If a strip foundation is planned for a large barn, then trenches should be made in the central part. Further, the prepared niches with reinforcement are filled with the same solution. After the concrete has hardened, you can begin work on the flooring device, which can simultaneously act as the floor covering of the future barn.
How to make a foundation for a barn from foam blocks?

There are two common ways to build a platform for a foam block barn. In the first case, it is supposed to create contour bearing lines according to the type of strip foundation. That is, a trench is made along the perimeter, which is filled with a combination of sand and gravel, after which blocks are laid on the cement mortar. Next, a connecting structure is formed for metal flooring or durable logs. The second method is used when working with objects that are demanding in terms of resistance to high loads. In this scheme, the contractor lays the foundation in blocks all over the site. The foam block itself is distinguished by low thermal conductivity, insulating qualities, ease of processing and low price. Therefore, from the point of view of obtaining high performance qualities of the barn as a storage of materials that are demanding on the content, this foundation option may be the best.
How to choose the best foundation option?

Before analyzing possible options for a suitable foundation, you should decide on the tasks that the barn will perform and the conditions for its operation. For a small building in a warm region, a pile foundation with several supporting rods will suffice. It is desirable to build objects of a large area on a monolithic basis - for example, from a solid concrete screed or in the form of a block platform. These techniques will allow you to build a durable and well-protected foundation for the barn at the bottom. Do-it-yourself monolith is implemented with a standard set of tools, but requires more physical effort. For example, laying a block may require the help of at least one partner.
Can you build a barn without a foundation?
Of course, it will not be possible to do without a supporting base, but the optimization of this structural part of the barn in some cases justifies itself. So, if there are no strict requirements for thermal insulation, then it is quite possible to confine ourselves to installing the frame on four concrete blocks dispersed in the corners of the future building. You can make a barn without a foundation and on cleared soil. Such projects are usually implemented using prefabricated structures, which provide a rigid wood or metal platform that replaces the foundation. But it is important not to forget that the classic foundation also guarantees the horizontalness of the surface. Therefore, it is important to initially adjust the rough coating so that it does not have serious deviations in heights over the entire area.

Conclusion
It would be wrong to consider the foundation as a part separate from the main frame of the barn. Even the high-quality implementation of the base without taking into account the nuances of the further construction device can cause many problems during operation. The main thing to pay attention to when pairing the foundation for the barn and its structural basis is the technique of forming a hermetic bundle. The transition is usually made from concrete or wooden logs to a metal profile. Next, the main sheathing is made along the frame of the barn, which can have several layers. Docking zones can be additionally treated with sealants, mineral wool and mounting foam.
Building a solid barn is far from being such an easy task as it might seem at first glance. If you want the building to serve you for more than a dozen years, approach the issue with all seriousness! We will consider which do-it-yourself foundation for a barn is best suited for such structures.
1 Foundation for a barn - savings and practicality
Light wooden structures that will be designed to store light gardening utensils, or will be reserved for poultry, for example, a barn for geese or small cattle, do not need a monolithic foundation. For such structures, a columnar foundation made of different materials is quite suitable. The most important advantage of such a foundation is its low cost compared to a monolithic version, and even a beginner in construction can build it! At the same time, such a foundation retains high performance characteristics.

The foundation on pillars can be arranged on any landscape, even on moving soils. Carrying out hydro- and thermal insulation work when arranging such a foundation is not a necessary measure, installation is carried out even without outside help. As a bearing base, pillars of concrete, brick, natural stone, foam blocks are most often created, sometimes wooden pillars are also used. True, in the latter case, the posts must be burned and treated with special solutions that will reduce the degree of decay, otherwise the structure on such a foundation will not stand idle for a long time.

2 How to make a foundation from pillars - a step by step process
The process of building a foundation on pillars should be carried out in a few simple steps. The first stage is the preparation of the territory, which includes clearing the area of debris, leveling irregularities and pouring a pillow of gravel if the soil is clayey. Then you need to make a markup, noting where which column will be located. Depending on how soft and mobile the soil in your area is, it is recommended to dig the posts from half a meter to a meter deep.

On hard soils, the recesses may not be strengthened, but on soft soils, a layer of reinforced concrete should be made at the bottom of each pit to protect the structure from possible subsidence. After that, we proceed to the second step - we make the formwork. For this purpose, boards 15 cm wide and 4 cm thick are best suited. If you do not want to fiddle with the formwork for a long time, make it from asbestos-cement or iron pipes, but these options will not be removed after pouring. After installing the formwork, reinforce with iron bars installed longitudinally.
When the fuss with the reinforcement is completed, fill the future columns with concrete mortar with fine gravel. Try to pack the solution as tightly as possible.
Then we proceed to the construction of the grillage - that part of the foundation on the pillars, which distributes the load evenly between all parts. Again, with the help of wire and reinforcement we connect the jumpers, we make a frame from the same reinforcement and mount the formwork. We fill everything with concrete and wait until it hardens completely. If you do everything neatly and evenly, then on the resulting foundation you can build a structure for a barn.

3 Do-it-yourself foundation for a barn made of foam blocks - features
It is much easier and cheaper to build a strong and insulated utility block right away than to strengthen and insulate the building during operation. In this regard, a barn for giving from foam blocks is the most successful option, since the foam blocks themselves are an excellent insulation, while being solid enough to act as masonry material. Although foam blocks are a lightweight material, a solid foundation is also needed for a foam block shed, and you can do it yourself, without involving specialists. It is best to make a strip foundation, under which trenches are dug no more than half a meter deep - there is no point in making the foundation deeper, the structure will have a fairly light weight.

After the trenches are dug, sand and fine gravel are poured onto their bottom, with a layer no thicker than 20 cm. The reinforcing cage can be made from fairly thin rods with a cross section of 10 mm. After the frame is installed, formwork is made from boards and concrete is poured. It is extremely important to pour the entire foundation in one go, so if you are doing the work without special equipment, then you will need at least 3 assistants to quickly mix the mortar and feed it to the trenches. It will take several days for the concrete to fully harden - do not forget to water it in hot weather with plenty of water so that it does not crack.

The type of base for the barn is chosen depending on the material from which the walls will be built. The foundation for a brick shed must withstand greater loads than for a wooden structure. It is recommended to determine the purpose of the outbuilding, as well as the type of foundation, before construction begins. In this case, it is important to take into account the characteristics of the soil.
For a barn, you can use the following types of foundations.
- Columnar. The advantage of such a foundation is the saving of building material and the speed of construction. Suitable for light frame-panel structures.
- Screw. Such a foundation is indispensable for building on heaving, swampy soils and sand. Work on the device of such a foundation can be carried out at any time of the year.
- Slab. Also used on marshy or loose soils.
- Tape: ideal foundation for a brick shed, stone or concrete block structure.
- The foundation for a shed made of blocks. Combines some advantages of the bases of other types. For construction, it is necessary to use lifting equipment.
Choosing the type of foundation depending on the characteristics of the soil
Soil analysis should be ordered from an organization specializing in services in the field of geology, geodesy and cartography. Depending on the type of soil in the area of the planned construction, certain problems may arise.
- loose, sandy soil. After melting snow or heavy rainfall, saturated with moisture, it can “float”. For construction on such soil, it is recommended to install a slab, screw or monolithic strip base.
- Clay soils and sandy loam: such soil is prone to deep freezing and the formation of quicksand. In this case, screw piles should be used.
- The gravel soil does not freeze to a great depth and does not form quicksand. On such soil, you can build a barn on a columnar foundation.
- Rocky soil: it is possible to erect any (except screw) foundation on it.
Screw foundation device
A screw foundation for a barn can be built in one day. You will need piles with a diameter of 80-90 mm in the right amount and one assistant. The procedure during construction is as follows.
- Along the perimeter of the walls, markings are made for screw piles.
- At a distance of 1.5-2.0 m from each other, shallow holes are dug into which piles are installed. This is necessarily carried out in the corners, and in the presence of internal partitions - along the line of their construction. In addition, if a plank floor is to be installed, the piles must be under the beams.
- Large piles (diameter over 100 mm, length over 150 mm) are screwed in using special equipment. Smaller piles are screwed into the ground manually, using levers. In this case, it is necessary to control their strictly vertical position according to temporarily attached spirit levels.
- Piles screwed into the ground are cut in height, for which a water level is used.
- Fill pipes with concrete.
- Heads are welded to the top of the piles. The foundation is combined into a single structure using a channel welded around the perimeter or an I-beam.
Important: screw pile blades must match the type of soil. For loose sandy soils - wide, for dense soil - narrow.
The video shows how screw piles are mounted in winter
Pillar foundation for a barn
The construction of a columnar foundation for an outbuilding can be done using:
- concrete mortar poured into the formwork;
- metal or asbestos-cement pipes reinforced and filled with concrete;
- brickwork (red ceramic brick is used);
- buta;
- concrete blocks.
The general construction rules are as follows.
- To install the supports, dig holes of the required depth in accordance with the previously made markings.
- The distance between the supports should be within 1.5-2.0 m.
- The depth of the foundation for the barn should be at least 150 mm below the freezing level of the soil.
- A layer of coarse gravel (about 100 mm) and the same layer of sand are poured at the bottom of the pits. Both bedding materials are compacted, two layers of roofing material are laid on top.
- The supports should be installed at the same level and rise above the ground by 150-200 mm.
- Two layers of waterproofing material are also laid on top of the supports.
- A blind area should be arranged around the pillars: this will prevent soil from washing out.
Important: the construction of the barn should be continued immediately after the construction of the foundation. Otherwise, spring heaving of the soil can partially displace the pillars.
A wooden foundation for a barn can be used as a base for a temporary building. To do this, it is necessary to prepare the required number of bars or logs from hardwood. Piles are fired to a state of charring or treated with an antiseptic.

It is recommended to wrap each support with plastic wrap or roofing material before installation: this will protect the wood from moisture and prevent the pillars from being forced out during spring heaving of the soil. For greater reliability, it is recommended to fill the hole around the support with concrete.
For a barn, you can use a combined type of foundation - columnar with a grillage. The technology of its creation provides for the pouring of a shallow strip foundation (0.7-0.8 m) with recesses for supports located at the corners and every 2.0 m.

Strip foundation for a shed

This foundation is the most popular for several reasons:
- its construction is comparatively cheap;
- able to withstand significant loads;
- is universal: on such a foundation it is possible to build a barn from any material.
Do-it-yourself strip foundation for a barn is built in stages as follows.
- The site is being prepared (the turf is removed, the site is leveled) and marking is carried out. With the help of stakes and a nylon cord, they limit the perimeter of the future foundation.
- A trench is dug along the perimeter of the barn, the depth of which should be 200-300 mm below the freezing level of the soil in the area.
- The width of the trench depends on the width of the base: it is necessary to leave space for the installation of formwork (100-150 mm on each side).
- A crushed stone pillow (about 100 mm) is arranged, which should be carefully tamped.
- Sand (50-100 mm) is poured at the bottom of the trench, which is also compacted.
- Formwork is knocked down from boards or sheets of plywood, the upper edge of which should be 200-300 mm higher relative to the ground level.
- The formwork is reinforced with struts, the upper edge is knocked down with transverse bars every 1.5-2.0 m.
- It is recommended to lay roofing material or thick (at least 50 microns) polyethylene on the inner walls of the formwork.
- Reinforcement is performed with steel bars with a diameter of 8-12 mm. Reinforcement elements are stacked and connected in such a way that a three-dimensional mesh with cells of 40-50 mm is formed.
- Concrete is being poured. To expel air bubbles, the concrete must be repeatedly pierced with a reinforcement bar around the entire perimeter of the pour.
- Curing concrete should be covered with plastic wrap and moistened periodically. This will prevent it from cracking due to uneven hardening.
- After 28 days, after the concrete has completely hardened, the formwork can be dismantled and the trench backfilled with soil.
- Two layers of waterproofing material are laid on top of the concrete pour.
How to make a foundation for a barn out of blocks

The foundation of concrete blocks in terms of its strength characteristics is in no way inferior strip base. The construction process consists of several stages.
- The site is being prepared, marking is being carried out, a trench of the required depth is being pulled out. The bottom should be leveled horizontally and rammed.
- Bedding is made of sand and gravel.
- With the help of lifting equipment, the blocks are installed in the trench. A cement-sand mortar is applied to the sides.
- Each subsequent row of blocks is stacked with an offset of half the length relative to the previous one. A cement-sand mortar is applied between the rows. At least one row of blocks must be laid above the ground.
- Bituminous mastic is applied to the side and upper sides with the help of a rag from a rag.
- The trench is backfilled with soil.
How to fill the foundation under the barn: the technology of building a monolithic foundation

A monolithic or slab base is the most reliable. You can build on such a foundation on any type of soil. The construction of such a foundation is a costly undertaking, but if it is planned to build a massive outbuilding in difficult conditions, the costs will be justified.
The technology for constructing a slab base involves a certain sequence of actions.
- The construction area is cleared of debris, bushes and trees.
- A hole 0.5 m deep is dug under the entire area of filling. At the bottom, after tamping, a layer of sand 200 mm thick is poured. The sand is moistened and carefully compacted.
- A 200 mm layer of crushed stone is laid on top of the sand, which is also rammed.
- Floor slabs are laid on a pillow of sand and gravel or prepared for pouring. For this, a formwork is constructed, reinforcement is performed: the lattice cell should be 20 × 20 mm in size. The formwork is poured with concrete.
- Air from the solution must be expelled using a vibropress.
- The uncured solution is covered with plastic wrap.
- The formwork can be dismantled after 28 days (during this time the solution will harden, the concrete will gain strength).
Important: the plate should rise above the soil surface by 100-150 mm.
Requirements for the quality of concrete solution
In order for the concrete foundation to withstand all loads, it is necessary to pay due attention to the quality of all components of the solution. The following rules must be observed.
- It is recommended to purchase cement with a fresh date of manufacture. For cooking, you can use Portland cement M400.
- In order to save cement, crushed stone of different fractions should be purchased: it will be better, denser to fit in the solution.
- It is important that the rubble is clean, without debris.
- Purified water should be used, as impurities make the solution weaker.
- The sand must not contain clay inclusions.
- When preparing the solution, the proportions of the components should be observed: 5 parts of crushed stone are mixed with 3 parts of sand, and then 1 part of cement. After stirring, water is added in such an amount that the consistency of the resulting mass is creamy.
At the end of the story about how to build a foundation for a barn, a video with expert comments. This information will help you avoid mistakes.
As a rule, the owners are not serious about arranging the foundation of the barn, since the barn is considered easy. outbuilding. However, it is strictly forbidden to do this, because the life of the barn in the future depends on the quality of the installation of the base.
Features of the foundation for the barn
There are certain features of the operation of the barn that must be considered when choosing a foundation for this type of building:
- it is not recommended to install a columnar foundation on clay soils, since heaving of the soil will simply squeeze out these pillars outward or fill up;
- when installing the foundation, it should be borne in mind that the small weight of the barn will not be able to withstand the heaving force;
- the foundation will always be affected by precipitation, in particular, melt water, rain, which, when frozen, will destroy the base reinforcement.
The choice of foundation for a barn depends on many parameters.
That is why it is very important to take into account the structure of the soil, its type.
There is a great way to determine how the pile foundation will behave on your site. You can make a trial screwing of the screw pile. This will determine the level of groundwater occurrence, the depth of the bearing layer. In order for heaving forces to be completely eliminated, the layer must lie well below the freezing level of the soil. This procedure is recommended to be carried out regardless of what type of foundation for construction was chosen.
The type of foundation depends on the type of soil in the area under study:
- coarse sand, rock, gravelly soil - a columnar foundation made of bricks or a recessed wall block;
Columnar non-buried foundation suitable for sandy soils
- sandy loam - a columnar foundation with insulation, bored piles with roofing material from asbestos or polyethylene pipes;
Drilled piles can be used on soils prone to heaving
- loam, clay or high groundwater level - pile foundation.
For a shed, a monolithic columnar or strip foundation is very rarely used, since their construction will cost much more than installing a frame shed.
The easiest foundation for a barn
The simplest and cheapest foundation for a barn is the so-called bored foundation. The technology of its arrangement is as follows:

By choosing this type of foundation for the barn, the owner will pay only the cost of materials, although some of them may already be available.
You can save a little more if you use ordinary car tires instead of asbestos pipes and roofing material, and on non-rocky soils you don’t even need to go deep into the ground. It is necessary to fill the cavity of the tires with sand, and then fill the surface with cement mortar.
Video: tire foundation
Do-it-yourself foundation for a barn
If you have the opportunity to increase the budget for arranging the foundation, then you can choose a more solid type of foundation.
When choosing piles for the foundation, it is necessary to take into account their bearing capacity, which differs significantly from each manufacturer.
Table: bearing capacity of screw piles
| Soil type | Bearing capacity of piles 89 and 108 mm with a diameter blades 300 mm in tons, taking into account the depth of the propeller |
|||
| 1.5 m | 2.0 m | 2.5 m | 3.0 m | |
| Soft plastic loess | 2,2 | 2,9 | 3,6 | 4,3 |
| semi-hard clay | 4,7 | 5,4 | 6,0 | 6,7 |
| hard clay | 4,2 | 4,9 | 5,6 | 6,3 |
| soft plastic clay | 3,7 | 4,4 | 5,0 | 5,8 |
| Semi-solid loams and sandy loams | 4,4 | 5,1 | 5,8 | 6,5 |
| Tough-plastic loams and sandy loams | 3,9 | 4,6 | 5,3 | 6,0 |
| Soft-plastic loams and sandy loams | 3,5 | 4,2 | 4,8 | 5,5 |
| Sand of medium and coarse fraction | - | 9,7 | 10,4 | 11,1 |
| Fine sand | - | 6,3 | 7,0 | 7,7 |
| The sand is dusty | - | 4,9 | 5,6 | 6,3 |
Since the mass of the entire shed structure rarely exceeds 2 tons, with certain calculations it can be concluded that only screw piles should be used. However, for greater reliability (remember that the lumber or rolled metal used for grillage has the ability to sag under its own weight), it is recommended to install piles at a distance of 1.5–2 m from each other. It is necessary to carry out work according to the following plan:

When installing this type of foundation, the barn requires covering the underground with decorative material, but you should take care of the ventilation holes.
Video: do-it-yourself pile foundation
Column Foundation
This type of foundation can only be used on soils where heaving is excluded. For pillars, you can use a wall block with dimensions of 40 * 20 * 20 cm.
If the site has clay soil, the installation process needs to be slightly changed:
- Make wall drainage, which will eliminate the main cause of heaving, insulate the sole with polystyrene foam around the entire perimeter.
- Deepen the pillars below the freezing level of the soil (if the height of the block is not enough for this, then you can backfill with sand or gravel).
For pillars, you can choose both wall blocks and bricks
These methods significantly increase financial and energy costs, so it is recommended to consider other options for arranging a columnar foundation on a flat surface:
- arrangement of pits - under each pillar it is necessary to remove a fertile layer of soil 40 cm thick;
- sand or gravel pad, depending on soil moisture, with tamping with a vibrating plate every 10 cm;
- drainage in the form of corrugated pipes along the perimeter of the blind area, which must be covered with rubble and covered with geotextiles;
- brickwork of pedestals, on which the wooden beams of the grillage are laid.
The work takes place in the following sequence:
- Conduct markup. The pillars should be deepened below the soil freezing layer, or one of the above methods can be used. If the first method is still chosen, then dig holes with a depth of about 1.5 m or more and a diameter of 1.2 m.
If necessary, the fertile soil layer can be removed
- Equip a sand cushion (if the soil is wet, it is better to take crushed stone) on top of the geotextile.
- Make a screed of lean concrete, which will further level the sole.
- Lay drainage sewerage using corrugated pipes.
- Lay out pillars from wall blocks (foam concrete, cinder block, brick). Fix the blocks with cement mortar. To strengthen the center of the column, you can put reinforcement.
- Make installation grillage. If it is buried, then the wooden beams must additionally be protected from moisture from the ground. For this, you can use foam.
For a barn as a grillage, you can use wooden beams
The columnar foundation must be waterproofed and drained
Video: do-it-yourself columnar foundation
You can always choose a way to build a budget foundation for a barn and do it yourself. This will significantly save on the construction of the hozblok.
Shed on foundation
The question: whether to build a foundation for a barn or not, confronts everyone who plans a room for an economic block or other non-residential structure. For a person who is ignorant of construction, an important factor is the choice of the type of base that combines reliability and reasonable price. The article will consider the question: how to make a reliable foundation for a barn with your own hands, and what are the advantages of building a change house on a solid foundation.
Why do you need a foundation for a barn
The shed is an indispensable building in private homes. It is used to store tools or necessary things for which there is no place in the house. It is indispensable for breeding domestic animals and birds. Some equip the barn as a workshop or garage. It is not surprising that every owner expects a long service from this structure.
While it may seem like the easiest way to get rid of the foundation when building a shed, there are some downsides to doing so. First, the layer of earth never stands still. Due to fragile soil and groundwater, it can move to the side, fail. This will lead to the fact that the walls of your building may tilt, move in different directions, which will lead to the collapse of the structure. It is possible that every year the barn will gradually fall deeper into the ground.
Secondly, compared to residential buildings, the barn has a lower weight, and without a foundation it will be difficult for it to withstand the onslaught of rain, strong winds and other weather vagaries.
Therefore, the foundation for the hozblok is an important point in construction planning.
 Shed on a column base
 What to consider when choosing a foundation
Modern construction methods offer a large number of options to lay the foundation for the future construction project. When choosing a foundation for a brick shed or woodshed, the following factors must be considered:
- Terrain relief. It is necessary to understand whether the barn will be located on a flat piece of land, or there is a slope in the place chosen for construction.
- Knowing the groundwater level will help determine if the foundation will need additional waterproofing.
- Knowledge of the soil structure is also necessary to select the type of foundation, since clayey or sandy soils are more conducive to settling of the structure, while firm rocky soil creates the possibility of using minimal forces on the foundation, as it will help in keeping the structure immobile.
- The selected materials will certainly have an impact on the foundation for the change house. The weight of the building and its strength will depend on them.
Taking into account all of the above factors, you can choose and build the optimal foundation for the barn with your own hands. What are the manufacturing steps for some of the main base types?
Tape type foundation
Such a foundation is considered the optimal basis for building on different types soil. Its main disadvantage is the relatively high cost of materials for manufacturing.
To fill the strip foundation under the barn with your own hands, you need to dig a ditch around the perimeter of the future building to a depth of approximately 70 cm, after marking it with pegs and a rope. The exact calculation of the depth of the ditch for the foundation is calculated individually depending on the climatic conditions. It is important that it is below the freezing level of the soil.
 Shed on a strip foundation
 If it is planned to build a large barn, pouring around the edges will not be enough. A concrete base will be required over the entire area of \u200b\u200bthe structure so that the floor does not sag.
At the bottom of the ditch, layers of crushed stone (10 cm) and building sand (up to 8 cm) are placed to strengthen the soil. All this must be carefully tamped.
The next stage in the manufacture of strip foundations is the installation of formwork from boards. It should protrude about 30 cm above the ground. This is how they usually protect the bottom of the barn from rotting. For reliability, it can be additionally reinforced.
At this stage of work, care must be taken to ventilate the base to avoid moisture accumulation. To do this, cut pipes made of metal or plastic are placed inside. The holes should be in different places to create air movement inside the foundation.
Now you need to prepare a concrete solution. It is a mixture of sand, gravel and cement in a ratio of 5:3:1. All this is stirred to a homogeneous mixture and poured into the prepared ditch. This needs to be done in 2 steps. First you need to make a thin layer of concrete around the entire perimeter and let it harden a little. This will create an insulation that prevents the escape of water and cement laitance from concrete mix which can greatly reduce strength. And then you can fill in the rest.
The prepared mixture must be used up during the day, because later, due to the hardening process that has begun, it will be unusable.
In conclusion, it remains to wait until the solution dries, and remove the frame. It is important to remember that construction can be continued 1.5-2 weeks after the foundation has been poured, when the concrete has hardened by 70%. The maximum strength of the foundation is usually reached in 24-27 days. A properly poured strip foundation will become solid foundation for a barn of any severity and workload.
Foundation on screw piles
This method, which allows you to pour the foundation for a change house with your own hands, was developed relatively recently. It is able to hold the structure even on the most unreliable soils.
 barn on stilts
 Table - the dependence of the pile load on its size and type of soil.

Installation of a pile foundation does not require large material costs. It will be possible to build a barn on screw piles without special machines. With the help of a crowbar or a piece of pipe, two adult men will be able to cope with this task.
You should start work with markup. Then, in the places where the piles will be, small holes are dug. Their goal is to direct the pile blade in the right direction. After that, you can start piling.
It is necessary to mount the structure on piles vertically, avoiding deviations.
Therefore, you can check the work using the building level or invite a third person to monitor the correct installation. After completion, it is necessary to check that the piles are at the same level horizontally.
Now the cavities between the ground and the piles need to be filled with concrete. This will help protect the base from corrosion. In conclusion, it is necessary to install the heads in order to begin the construction of the utility block itself.
Column Foundation
As the simplest foundation, a columnar foundation is chosen by those who do not have sufficient experience in construction. It does not require large material costs and physical effort to manufacture. The only drawback is the inability to use this option on unsteady soils. There is an algorithm of actions on how to design a columnar foundation for a barn.
 Shed on a column foundation
 First you need to clean and prepare the space where the barn is planned to be erected. Clay soil will have to be covered with a 10 cm layer of gravel. Now the installation points of the columns are marked. In these places, holes should be dug up to a depth of 1 m.
Before starting the installation of the posts, the bottom of the recesses made must be covered with sand and gravel by 15 cm, and then rammed. The posts used can be made of wood, bricks or concrete blocks. If the planned structure is heavy, the posts should be strengthened with a reinforcing bar.
After fixing the posts, you need to install the formwork and pour the concrete solution. The construction of the shed itself can be started 5-7 days after the concrete has hardened.
The foundation of car tires
 Shed on tires
 For car owners, this is a good opportunity to give a second life to tires that are no longer possible to drive. A structure can be built with a tire base in two ways.
On unsteady soils, it is necessary to dig holes with a depth below the level of freezing of the earth. Their size must match the tires. The bottom is reinforced with a compacted crushed stone cushion, and the tires are stacked. All this is covered with inert material.
On more durable soil, it is enough to remove the fertile layer, strengthen and compact it with sand. The tire, placed on top, will serve as a formwork for concrete. It is worth remembering that after the concrete dries, such a base loses some of its strength, therefore it seems to be a less reliable option compared to the first.
 Foundation device for car tires
 The disadvantage of such a foundation is the wide diameter of the tires. Since the wall of the change house is in the middle of the tires, they will be clearly visible after the construction of the shed is completed. Therefore, they need to be painted or disguised so that they do not spoil the overall look. When using the base of the tires in the subfield of the utility block, voids are formed that are favorable for the penetration of moisture and favorable for the appearance of rodents.
For the manufacture of protective padding in metal sheets, openings are cut to fit the size of the protruding parts of the tires.
Block foundation for barn
The construction of a foundation for a change house from blocks is similar to a tape one, only it costs the future owner of the barn less. First, a trench up to 60 cm is dug, the bottom of which is also reinforced with rubble and sand. A layer of concrete is poured on top, on which you can begin to lay blocks. After waterproofing the base, the trench must be buried.
The bottom of the foundation for a foam block shed will be a little smaller, since this fairly light material shrinks less. The width should match the size of the block so that it fits without too much effort. The concrete pad is also important when working with the foundation for a foam block shed, therefore, after the formwork is installed, it is poured with a layer of up to 20 cm, and the laying of the blocks begins after the concrete has hardened.
Other types of foundation for a barn
If you have a drilling rig, you can use bored piles instead of screw piles. To do this, it is necessary to drill wells in the designated places, insert asbestos-cement or polyethylene pipes into them. The formwork for the pipe is made from a piece of roofing material, the seam of which is fixed with bituminous mastic.
The pipe is poured with concrete mortar in two stages. First, the space is filled by about a third, and after reinforcement, the filling is completed.
A rather rare way is the foundation on reinforced concrete sleepers. The reason is the difficulty in acquiring this material. For such a base, as well as a tape one, a trench is dug. Only sleepers are laid on its bottom so that the joint of one row coincides with the whole sleeper in the next.
To summarize: the question - which foundation to choose when building a barn depends on several factors. Firstly, this is the terrain on which the future building will be located, and the type of soil. Secondly, they will play a role financial condition and construction skills of the master. Thirdly, the choice of materials for the change house itself is important. So, the foundation for a block shed will be different from a brick or wooden structure, so before choosing the simplest method of pouring the foundation, you need to make sure that it will keep a decent look for your shed for many years.
The construction of a utility block, ancillary premises, or, more simply, a shed in a summer cottage, is started after most of the finishing work has been completed, tools and materials must be removed and stored in a more suitable room. Building a hozblok on your own is not a particular problem, with the exception of the foundation, in which case you will have to tinker with your conscience. On how conscientiously the foundation for the barn is made with your own hands, depends on its durability, strength and the cost of repairs and alterations.
Which foundation scheme for the barn to choose
Of course, the design and type of foundation for the barn depends, first of all, on the design of the barn itself, more precisely, on the degree of its “capitality”, the heavier the building, the more and deeper you will have to dig a foundation pit for the foundation for the barn with your own hands. Four building schemes are commonly used:
- The classic columnar version of the foundation is used for lightweight structures made of boards, plywood, siding with a simple pitched roof. This is the simplest foundation for a barn in the country;
- A pile foundation can be called a universal structure; it can be used for light sheds made of timber or a frame house;
- The tape version of the foundation base is used either for a box of blocks and bricks, or for arranging a basement.
Often, a barn is set up without any arrangement of support and binding to the ground. For example, if the site has a heavy rocky soil with a high content of crushed limestone or an exit to the surface of limestone, marl-dolomite "tongues". In this case, it is easier and faster to build a foundation on one sand cushion with your own hands.
Advice! It is enough to make the correct drainage of rain flows and tamp the sandy backfill. On this basis, a barn without a foundation will last longer than on a shallow concrete strip laid on quicksand or loamy soil.
Building a barn without arranging a foundation is faster and without serious costs. But the results of such construction are poorly predictable, especially if the shed needs to be built on virgin lands, where there are no neighbors and there is no way to clarify the composition of the soil.
Is it possible to build a barn without a foundation
The best option without a foundation is suitable for a light panel shed made of OSB, plywood or lining. A lightweight structure weighs only a few hundred kilograms, but in any case, the installation of even such a lightweight structure will require the use of a “plastic” shed structure, which, along with low weight, has good adaptability to the deformation of the upper soil layer. Even though there will be no precipitation, the barn box may lean or simply rot due to the accumulation of moisture under the floor.
Therefore, for the construction of a barn without a foundation foundation, several conditions must be met:
- Low level of ground and surface waters in this particular point suburban area. To do this, you will need to make good drainage or perform a sufficiently powerful sand and gravel backfill;
- Good protection of the barn from gusts of wind. The foundation plays the role of an anchor, so most often the building is oriented according to the wind rose and hidden behind the building of a country house;
- Ensuring normal ventilation of the underground space, to remove accumulated moisture and condensate.
In addition, for the construction of a barn, it will be necessary to remove the top layer of fertile soil, tamp the soil, treat the base with a herbicide or cover it with a geotextile, lay a film and cover it with a layer of sand.
Even without foundation sand base under the barn must be carefully tamped and leveled on the horizon. The binding of the base from a bar, even treated with protective mordants, cannot be laid on sand, so the best option would be to install the beams on a curbstone, paving slabs, or, in extreme cases, a lined row of rubble or bricks.
Even a light frame structure without a foundation cannot be left simply standing on a gravel pad or on curb supports. This installation method is used only for open wooden arbors. The barn has three times the windage. For example, for a structure 2.5 m high and 2 m wide, the transverse area of the silhouette will be almost 5 m 2. With wind gusts up to 15 m/s, the pressure of the wind flow can reach 100 kg/m 2 . Even in the most favorable conditions a barn without a foundation will be subject to a tipping force of up to half a ton. Even if a building without a foundation does not tip over, over time the barn will simply be thrown off the curb supports.
Therefore, the barn box must be sewn to the ground using steel rods, pipes or pieces of reinforcement hammered into the ground.
Do-it-yourself options for making a foundation for a barn
Traditionally, a barn is built either in the form of a light panel or plank structure, or from lightweight materials - gas silicate blocks and foam blocks. This option is cheaper, simpler and easier to build. Much less often, a barn is built of timber or brick, such a construction is much more expensive. It is usually resorted to if a single capital utility block is being built, which includes, in addition to the shed, a garage and a room for livestock. In this case, the foundation for the block shed is built exclusively on shallow concrete foundation strips.
The simplest columnar type of foundation
The construction of the foundation begins with leveling the site and removing the fertile soil layer, as in the previous case, it is necessary to plan a piece of land and hammer in pegs with a cord, indicating the outer perimeter of the walls. It is not difficult to make the dimensions of the boundaries of the future foundation, it is much more difficult to achieve the maximum perpendicularity of the mating sides of the future building.
Oddly enough, but the stage of marking the future columnar foundation has always been and remains the most time-consuming and requiring patience operation. To make the barn with clear right angles, when marking, special devices are used in the form of two frames.

According to the markup, we put the installation points of the columnar supports. For the foundation of a barn measuring 2x4 m, 12 supports are required. In order for each pillar of the foundation to have maximum stability, it must be deepened into the ground by 15-20 cm. We pour a pillow into the dug holes - a layer of gravel, and then sand and carefully tamp.

As foundation supports, it is easiest to use ready-made cinder blocks or cast supports into reusable formwork assembled from plastic lining. The second option is more laborious, since you have to do a fairly large amount of work:
- Collect the formwork, install it in the pit and align it with a vertical plumb line;
- Fill the formwork with concrete, after preliminary setting, the casting is freed from plastic;
- While the concrete is still damp, the upper edge is carefully cut with a knife along the horizon so that all the supporting planes of the foundation columns are at the same level.
Important! Height adjustment has always been the most difficult operation. Therefore, sometimes, instead of trimming into the thickness of the concrete “on the wet”, an anchor bolt was driven to fasten the beam strapping, the height of the foundation column was regulated by linings made of metal or cut out wooden planks.

If the foundation base needs to be made as quickly as possible, then ready-made cinder blocks can be used instead of casting. Previously, each block is tamped or upset with light blows on a sand cushion so that the supporting surface of all pillars is in the same plane. After that, the cinder blocks are fixed by pouring concrete mortar into the pit.
It remains to install the strapping of pine timber. The corners of the beams are connected half a tree and hammered with nails, it is better not to use screws. Nails allow the connection to play under load, and screws split the wood. After assembling the perimeter of the base in the same way - in half a tree, we saw down and cut the transverse beams.
It remains to treat the wood with a pickling solution and sew up the strapping with a 20 mm edged board.
Arrangement of the foundation for a capital barn
The warmest and most convenient for a summer cottage is a barn built from a foam block. The cost of construction is relatively low, most of the work, for example, a box and a foundation for a shed from blocks, can be done by hand.
Unfortunately, lightweight materials such as gas silicate block or foam concrete do not have sufficient rigidity so that walls can be installed on a light foundation. In most cases, the box has to be reinforced with reinforcing belts from reinforcement, and as a foundation for a barn from foam blocks, a shallow concrete tape is cast.

At the first stage, it will be necessary to make a pit for a shallow-depth LF. By marking the outline of the future barn, we dig a trench 20 cm wide and 50 cm deep. There are two ways to build a cast concrete foundation for a barn from blocks:
- casting into the ground;
- Traditional pouring concrete disposable formwork.
In the first case, during the construction of the foundation, a large overconsumption of concrete is obtained, casting into the ground can be used if it is possible to use rubble stone to enhance the strength of concrete. The addition of only 30% of the trench volume with fragments of heavy igneous rocks makes it possible to abandon reinforcement or any other strengthening of the foundation. In the second case, the construction of the foundation base will require additional costs for the assembly and installation of formwork panels, their dismantling, coating waterproofing and backfilling.

In practice, for a one-story barn, the foundation base is most often poured without formwork, just a pillow of gravel and a mixture of screenings and sand is laid on the bottom of the trench. The trench will need to be made wider, about 25-30 cm. So that the foundation for the barn does not crack, it is necessary to carefully align and trim the walls, remove roots and stones. Otherwise, the waterproofing film will not lie flat, and the pressure of the concrete will simply tear it apart. If the soil is sufficiently dense, then the depth of pouring can be limited to 30 cm, for sandy loam and loose loam, it will be necessary to increase the height of the tape to 40 cm.

Before pouring concrete, the edges of the trench are built up with the help of scraps of boards supported from one edge by the soil taken out during digging. Thus, it is possible to easily make a foundation base for a barn 15-20 cm high. The upper part of the base of the building, protruding above the ground, can be laid out with a large rubble stone and poured with concrete mortar. After a day or two, the earth and boards must be removed, and the film must be cleaned of soil and glued to the walls of the foundation.
Ideally, it is necessary to pour the foundation in one go, but doing it alone is quite difficult, since it will be necessary to lay at least one and a half meters of cubic concrete under a barn with a base of 2x4 m. For an ordinary 50-liter concrete mixer, this is 30 batches, and they need to be done within one day. If the concrete foundation under the barn is filled with rubble stone, then half the volume of mortar can be dispensed with. Alternatively, you can rent a 100-liter concrete mixer for a day and make 7-10 batches, it is unrealistic to buy one and a half cubic meters of concrete for the foundation of a barn, since automixers practically do not work in such portions.
Special cases of foundation construction
The place on the site for the construction of a barn, as a rule, is chosen according to the residual principle, where it is convenient to make a utility block, without taking into account the quality of the soil and the ability to build a normal solid foundation. If the shed has to be built on a slope, and even on greasy siliceous clay, then the only possible option would be to pour a mixed foundation structure. It is in many ways similar to the tape version, but bored piles are cast in the corners and midpoints of the long sides of the base of the building.

In this case, before backfilling the bottom of the trench with a gravel pad, it will be necessary to drill wells with a garden drill in the corners of the future foundation of the barn. The depth and diameter of the well are 120 cm and 15 cm, respectively. Inside the wells, a sheet of roofing material rolled into a roll is laid, and a T-shaped frame is inserted from reinforcement or a corner. The top shelf should be located at a height of 15-20 cm from the bottom of the trench. After that, you can fill the foundation with concrete and level the basement of the barn for laying the foam block.
Conclusion
If the walls of the room are supposed to be built of brick or heavy cinder block, then the foundation will need to be reinforced with reinforcement. At least two strands of 8 mm steel bar are laid for every 15 cm of foundation height. For foam block and gas silicate, the basement of the foundation tape must be reinforced with an additional armored belt. Given the relatively low rigidity of the foam block, wood concrete and gas silicate, an additional row of reinforcement will help to avoid problems during the settlement of the walls of the building.
-
 April 17, 2015Exchange Requirements for Brokers
 -
 April 17, 2015Can retirees be mortgage guarantors?


