Attached to garden shed. What and how is the interior decoration of the veranda in a private house. Beams are laid using this technology


Having built or bought a private house, the owners may be faced with a poorly thought out layout, which is why there is not enough free space inside. An excellent solution to this problem is a turnkey timber extension to the house - the price of which depends on the type and configuration, but in any case is less than the redevelopment of the house. Such a structure can be used as a summer kitchen, an entrance hall, a place for outdoor recreation, a storage room, a garage.
Despite the apparent simplicity of the design, the construction of an extension will require certain knowledge and skills. construction works and a specific set of tools. In addition, in order for the object to be safe and stable, it is necessary to build a reliable foundation and frame. For closed extensions, it is necessary to provide for wall decoration, an entrance door. Considering that the extension is often adjacent to the house, which means that the foundations can be skewed, it is better to entrust the design of such a room to a specialist. This is a guarantee of a well-designed project and quality work performed.

Closed bright extension to the house, used as a living room Source houzz.es
What options for extensions can be
There are some of the most common options for using attached premises.
Porch. Structures can have any number of steps, be swivel and high. Railings are installed for safe use. Blocks and wood are used as building material.
canopy is the simplest design that is easy to dismantle. It is designed to protect against rain and sunlight. Under an open canopy, it is pleasant to have family dinners, relax in the midday heat. The foundation device is optional, it is enough to provide support pillars made of metal, concrete, treated wood. The frame of the structure is fixed on the supports. If desired, the walls are sewn up with polycarbonate.
Lounge for summer. Such an extension increases the living area of the house. The type of foundation is chosen tape or columnar. The walls are built from warm durable materials: blocks, timber, slabs. In order for the room to be light, double-glazed windows are installed. Heating is not required for summer residence.
Garage as an extension to country house allows significant savings compared to the construction of a separate facility. It is built on a strip foundation, the walls must be made of non-combustible material. Economical slate, corrugated board, metal tile are chosen as the roof. To prevent the smell of gasoline in the house, be sure to install a good garage ventilation system.
Capital living quarters with the possibility of living all year round. The construction requires a block or monolithic foundation, brick or block walls. The roof and walls are insulated, a heating system is provided.
Kitchen-dining room. When arranging a kitchen, it is necessary to bring communications and install ventilation, so the object requires careful design. Such extensions are often erected to old houses, where a cooking room was not originally provided.

Large bright kitchen attached to the house Source stroilef.ru
To make the building look harmonious, the extension is made in the same style as the main house.

An extension made of the same material as the house Source bark.com
What materials are suitable for building extensions
For the construction of an extension to a country house, projects are drawn up by architects, taking into account your wishes. Materials are selected depending on the financial capabilities and purpose of the extension. The most commonly chosen are:
Beam of any kind: rounded, planed, glued. Glued material has higher thermal insulation properties, while rounded material has the most attractive appearance. The advantages of timber include affordable cost, high environmental performance. It is suitable for building with any purpose. Wood is treated with special compounds to protect against pests, the appearance of mold, fungus. Objects from a bar are erected quickly and simply.
Moisture resistant chipboard or OSB boards used in frame structures. The material has high noise insulation properties, retains heat well. In residential extensions, additional insulation with mineral wool is performed. The cost of the material is affordable. Experienced builders will quickly cope with the task of wall cladding with chipboard or OSB boards.
Brick. The material has high strength, durability, a wide palette of colors. But at the same time, they will ask for the highest price for working with bricks. In combination with double-glazed windows, the material is suitable for the construction of a winter garden, a greenhouse. Bricks are heavy, so you need a reliable foundation for an extension to the house. The most difficult stage in the construction of such a structure is docking with the main object.
Foam blocks and aerated concrete blocks. The advantages of the material include affordable cost, high thermal insulation due to the porous structure, short construction time from large blocks. The structure is lighter than brick, does not require a reinforced foundation. The disadvantages of block objects are the need for cladding, since their surface is destroyed under the influence of precipitation and other negative factors.

Extension from foam blocks to wooden house Source celinrmo.ru
Regardless of the chosen material, the safety and reliability of the constructed object is correlated with the quality of its connection to the main structure. The simplest option is the construction of an independent closed foundation. The space between the walls of the extension and the house is filled with insulating materials.
Video description
See the video for an example of the construction of one of the types of foundations for an extension:
When a new building is introduced into the main structure, the extension frame is connected with reinforcement to the base of the foundation of the house. To connect the walls, part of the elements of the box of the house is dismantled. To make a single roof, the extreme rows of the cover are removed and the rafters for the extension are attached to the main beams. When an extension to a wooden house is being built, the price of work will be higher than with an independent building.

The frame of an extension to a wooden house, connected to the main roof. Source yandex.ru
Frame extension to the house
The frame option refers to the budget, it does not require large investments. Structures can be modest in size 2x2 m, 2x3 m or be spacious structures with dimensions of 5x2 m, 6x3 m.
For the base of the object, a frame is mounted from a metal profile or processed wooden beam. The frame is erected along the perimeter of the building and for each wall separately. Such objects are lightweight, they can be built on a columnar or pile foundation.
The created structure is sheathed on the inside and outside with moisture-resistant chipboard or OSB boards. To increase thermal insulation between the plates, a layer of insulation is laid: mineral wool, polystyrene foam, sawdust. The thickness of the thermal insulation is usually 50 mm. To prevent the insulation from getting wet, it is waterproofed with a special membrane from the outside and inside.
The roof of an extension to a house from a frame can be single-pitched, gable or complex in shape. Ondulin, metal tiles, keramoplast are chosen as roofing. External finishing of plates is carried out by clapboard, block house, siding.

Construction of a frame extension to the house Source rl-remodeling.com
If a decision is made to attach a terrace to the house, options, prices and projects must be studied in advance. In this case, all the pros and cons of materials and construction technologies will be taken into account.
On our website you can find contacts construction companies, which offer the service of extensions to houses. You can directly communicate with representatives by visiting the exhibition of houses "Low-Rise Country".
The choice of materials for an extension to a wooden house
Even if a wooden house has a significant area, many owners decide to increase it. In the annex, you can equip a nursery, workshop or storage of sports equipment.
most accessible and in a simple way construction will be a frame structure. It is not inferior in reliability to capital facilities, but is being built in a short time. AT wooden building the frame can be logs or timber; chipboard panels with clapboard or block house are used for sheathing.
A more costly option is the construction of timber or logs. But outwardly, the extension will be in harmony with the main wooden house as much as possible. Such an object has an optimal microclimate inside.

A log extension to a wooden house looks harmonious Source assz.ru
It is not recommended to use brick for attached extensions to wooden houses; a heavy structure can cause the foundation of the main house to skew.
Video description
The nuances of building an extension to a wooden house, see the video:
Extension of a veranda or terrace
Most often, terraces or verandas are attached to houses; these structures have some differences. A terrace is an open structure with fences around the perimeter. It may have a roof, combined with the house. The building is erected on its own foundation or attached to the main object. Terraces are recommended to be located on one side of the house or encircle it around the perimeter. On such an extension it is convenient to relax in the summer, it can be used for barbecue.
Video description
An example of how to attach a terrace to the house, in the video:
A veranda is considered a closed building, which is a continuation of a house with a common roof. The design can be with solid walls or partial glazing. The veranda, as a rule, is attached to the finished house to increase its usable area.

Covered terrace attached to the house Source obustroeno.com
What elements does an open terrace consist of?
If you order the construction of an open terrace in construction organization, then the following items will be included in the kit:
- Terrace poles made of wood with a diameter of 10x10 cm. They are installed at a distance of 1.3–2 m.
- Elements for the construction of the foundation: pillars, piles.
- Wooden railings, balusters with carved trim.
- Roofing material of the selected color: profiled sheet, metal tile, ondulin
- The floorboard is tongue-and-groove or planed.
At your request, any additional elements can be included in the package, for example, balusters are replaced with a continuous clapboard fence.

Open terrace made of wood, attached to brick house Source pinterest.com
What elements does a closed veranda consist of?
Unlike open structures, closed verandas have walls. When ordering the construction of a closed veranda, the following items are included in the kit:
- Poles for mounting the frame from boards 4x10 cm, jibs 4x10 cm.
- Heat-insulating material KNAUF, layer thickness 5 cm.
- Grooved floorboards 3.6–5 cm thick.
- Lining for external finishing.
- Entrance door with fittings.
- Roofing material.
The set for buildings with glazing is complemented by wooden or plastic windows with fittings.

Closed veranda Source stroyvsadu.ru
Photos of extensions to the house
Frame extension on pile screw foundation- a simple and relatively inexpensive option. Building with a pitched roof.

Construction of a frame extension to a brick house Source lawofbank.ru
The glazed porch with a white gable roof is in perfect harmony with the house. The frame structure was erected on a pile foundation, finished with decorative elements. On the veranda it will be comfortable to relax at any time of the year.

Closed extension to the house with a gable roof Source photonshouse.com
Brick veranda with glazing - you can spend time in it even in winter. The structures were erected on a strip foundation. The interior space is used for recreation.

Closed warm veranda Source gomfer.com
Residential built-in mansard-type extension to a wooden house - a good option for increase square meters living space with saving space in the yard. The building is made of timber, built partially on the foundation of the main building with additional columns.

An extension to a wooden house made of timber with an attic Source postila.ru
Attached summer kitchen frame type with glazing. Made on a wooden frame, sheathed with sip panels. The roof is pitched with a slight slope.

A simple and relatively inexpensive version of a frame extension to a wooden house is a glazed porch. Source pingru.ru
A garage attached to a wooden house is a great way to save both money and space in the yard. The structure is made of timber with a built-in roof.

Garage attached to residential building Source stroy-dom.net
Residential extensions to the house are made of timber. Block foundation of tape type. Extensions allow you to significantly increase the internal area of \u200b\u200bthe house.

Two outbuildings to one log house Source ro.decorexpro.com
Extensions to wooden houses can be used to increase living space or household needs. Such objects are constructed from timber, logs, blocks, bricks or using frame technology.

The process of erecting a wooden extension to the house Source prakard.com
Conclusion
If you decide to build an extension to the house, architects and designers will help you draw up a project, calculate the amount of materials needed and the cost of work. Specialists will do everything possible to ensure that the extension cost you as little as possible, while meeting all your wishes.
Today we have not an ordinary homemade product, but a very complex project: we will tell you how, with the help of direct hands, you can make an extension to the house yourself!
First of all, construction begins with a floor plan. Having calculated the required area, I marked the ground with a size of 3 m by 5 m and dug a trench under strip foundation 50 cm deep and 40 cm wide. Then he laid a bunch of reinforcing bars and welded brackets to the bars. Further in the article there will be a description and photos for which I made these staples. I don’t even want to remember the process of manually mixing concrete with a shovel and pouring it)) I’ll just say one thing: it would be better if I called a mixer with ready-made concrete and poured it))). Having exposed the formwork from the boards, I brought the foundation 20 cm above ground level and leveled it. M-400 cement was mixed with sand screening in a ratio of 1 to 3. The strength result was impressive.  After the concrete hardened, I started pouring a concrete podium for installing a gas boiler measuring 1m by 1m, laying it in two places with a grid and setting up the formwork.
By pouring the staples protruding from the foundation with concrete, I got pillows for laying floor timber (lag) on them. I needed the staples to avoid the pillows falling into the ground and, as a result, the floors being skewed. I arranged them in accordance with the recommendations for installing the floor. That is, at a certain distance from each other and strictly according to the level. 
 This completed the foundation work. Then he started building walls. First of all, he made a waterproofing of the wall material from the foundation by spreading the roofing material over the entire area. After all, concrete conducts moisture very well and if moisture insulation is not made, then mold may appear on the walls, the walls themselves may crack.
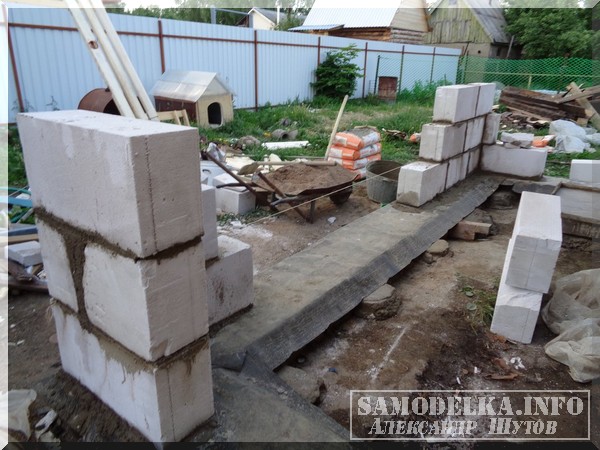
  My next step was marking for the wall itself. The distances of the sides from the wall to the opposite wall did not differ, and the diagonals of the corners were the same. Having outlined the corners, I started laying foam blocks measuring 20x40x60 cm.
 The plans included exterior wall decoration with siding, so I set up the block with a beacon rail and a corner from the siding in such a way that after finishing the extension siding would not “dance” from the siding of the house. To bind the blocks together, a mixture of cement and sand was used in a ratio of 1 to 3. Special mixtures and glue are also sold. Before laying on the mortar, the blocks were wetted with water. This greatly facilitates the laying process. With a rubber mallet, the blocks were seated in place.
 Any masonry is erected from corners, so I was no exception and acted exactly with the recommendations, adjusted for doorways. To obtain blocks of shorter length, an old hacksaw was used) She did an excellent job with her work. But on sale there are special saws a.

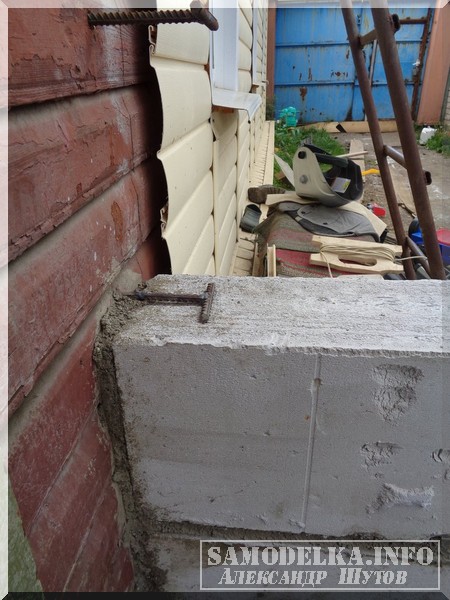
 To connect the walls with the main house, I made T-shaped brackets from reinforcement and, having drilled a wall, drove them in with the expectation that they would fall into the seam between the blocks.
 He erected walls taking into account window and door openings using a construction level one and a half meters long and a plumb line. Those. blocks were stacked strictly vertically and horizontally. This is especially important for door and window openings. The thickness of the seam can adjust the height of the blocks relative to each other.

 When the height of the walls reached the required level, U-shaped channels were made from a metal corner measuring 5 cm by 10 cm for laying blocks over door and window openings. The length of each was the sum of the length of the opening plus 40 or 60 cm for laying on the wall. To do this, put the corners on the block with the long side to each other and welded them together using a welding machine and fittings to obtain a gap between them. The gap is needed for screwing self-tapping screws into blocks during the installation of doors and windows.


 Then I simply put the channels on the blocks and screwed them with self-tapping screws for complete fixation. It would be possible to turn them over differently and put the blocks on top, but I put a board into them from the bottom for attaching window frames and doors.

 Having laid the foam blocks on top of the channels, I sawed a beam of 100x150 cm and laid it out on top. I screwed it to the foam blocks with 200 mm self-tapping screws and fastened the timber together with reinforced corners. It is necessary for ceiling beams and truss systems.


 Having screwed a bar 50x75 mm to the wall of the house. I got the support for the ceiling beams. Important!!! For each roof, the thickness of the beams and rafters for the roof, as well as the distance between them, is calculated individually. Beams 50x75 mm. screwed to the beam corners.

 Since the height of the extension was the same as the level of the house, after installing the beams, I had to remove part of the slate above the house to get a roof slope over the extension. After that, the rafters were assembled. For fixing the rafters, 250 mm nails were used.
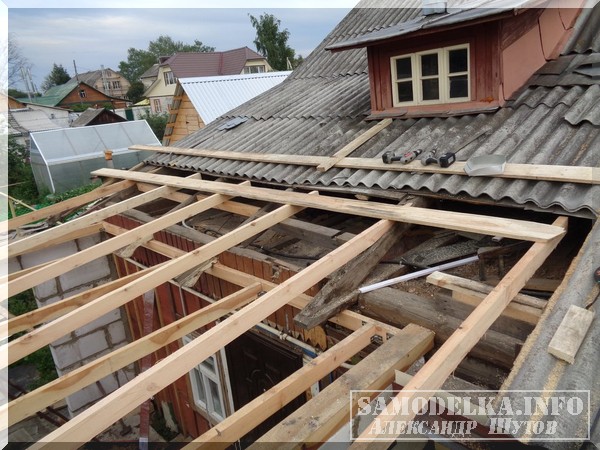 He laid a crate of boards measuring 25 mm by 150 mm on the rafters, laid heat and vapor barrier on the rafters and proceeded to laying the metal tile.
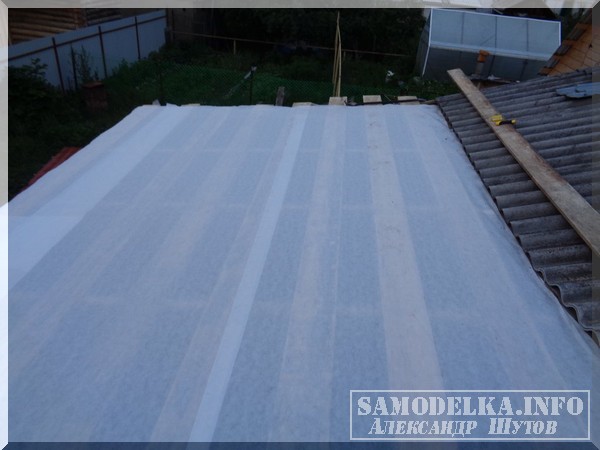 The metal tile was bought almost from the factory and had the length I needed. It did not even have to be cut or adjusted to each other in length. After laying out the sheets on the roof and slipping them under the old slate, I aligned them with each other and the walls. After fastening, I cut off the excess parts of the crate.
 He laid the logs on pillows, laid the floors from a board 40 mm thick.
 The doors were installed next.
An important role in creating the interior is played by the decoration of the veranda from the outside and from the inside. Since the veranda is an unheated extension to the house, the material used for finishing the veranda in a private house must be resistant to temperature extremes and high humidity. Although the veranda is not heated, you can put a heater for the veranda, and so that the heat does not go away quickly, it needs to be insulated. It will definitely be necessary to lay some kind of insulation under the finishing material that is not afraid of moisture, which is formed from the temperature difference between night and day.
Wooden decoration of the veranda inside photo
First, the waterproofing of the veranda is laid, which must be hermetically glued together with metallized tape, and then the insulation is laid and covered with a layer of vapor barrier and finishing material. It is necessary to insulate not only the walls but also the floor and ceiling. On the insulated veranda it will be about 7 degrees warmer than on the street, so the insulation of the veranda is not economically viable.
You can trim the veranda from the inside with different materials. Most often, the arrangement of the veranda is made with wooden materials such as clapboard, eurolining, block house.
 As if a veranda made of logs was finished from the inside photo
 Before equipping the veranda with wooden materials, it is necessary to treat with an antiseptic composition not only the wooden materials themselves, but also the wooden parts of the veranda that will cover the finishing materials.
PVC panels are also widely used for finishing the veranda.
 PVC pavilions and verandas are very neat and beautiful.
 Plastic panels are very light and resistant to high humidity. Plastic panels come in different colors and with different patterns, so you can make a colorful veranda out of them. It is necessary to mount PVC panels on a specially pre-assembled frame made of wooden beams with a section of 30 x 20 or from a metal profile that is used when installing drywall. Since the panels expand very much when high temperature then it is necessary to leave gaps of 2 cm at the edges and cover them with skirting boards.
MDF panels mimic the structure of wood.
 The summer veranda attached to the house is sheathed with MDF panels from the inside
 They are much stronger than plastic panels. However, MDF panels are very much afraid of dampness. Fasten MDF panels in the same way as PVC panels to clamps.
If you finish the gazebo with OSB plates, then you will need to make a good and powerful frame from bars with a section of 10 x 10 cm.
 Attach a veranda to a country house sheathed with OSB slabs
 OSB boards can be fixed inside and out, but the outside of the board will need to be covered with siding or corrugated board, otherwise they will get wet from the rain and collapse as a result. If insulation is laid between the plates on the veranda of OSB boards, then it will be necessary to put waterproofing and vapor barrier to protect the insulation from moisture.
From the outside, it is best to finish the veranda with siding. 
They produce siding in a variety of colors and shades. Vinyl siding is considered standard because it is lockable, durable and easy to install. Siding is usually fixed in a horizontal position. Siding is mounted on a pre-prepared crate of 40 x 50 bars in increments of 40 or 50 cm. Be sure to remember to fix the bars around the windows.
At the very bottom, a starting profile is attached strictly horizontally to the crate. Then the side profiles are installed and fastened at the outer and inner corners. The side profiles must enter the starting profile by 5 mm. Also, side profiles are attached around windows and doors.
 country houses with a veranda photo
 You need to cut the panels not equal in size, but less by 5 mm, since the siding expands when the temperature rises. The panels must first be led into one corner profile, and then, having bent the panel in the middle, lead it into the opposite corner profile. Having aligned the panel in the center, we bring it to the bottom in the starting profile until it clicks, and then the upper edge of the panel. It is not necessary to fasten the screws to the crate tightly so that the panel moves freely to the left and to the right. We also insert the following panels into the corner profiles, snap them into the lock at the bottom, and fasten them to the crate with screws from above. Before installing the last panel, you need to fix the finishing profile strictly horizontally. If necessary, the last panel will need to be cut to width. Having installed it in the corner profiles, you will need to snap it into the lock at the bottom, and insert the top into the finishing profile.
If an attached veranda is made to the house from polycarbonate, then it will not need to be finished and insulated.
 Sliding polycarbonate veranda attached to the house
 Polycarbonate is mounted on the roof of the veranda and on the walls using self-tapping screws with rubber washers. To make a polycarbonate veranda, you will need to make a frame of wood or metal that will serve as a support for the polycarbonate. The frame is made in increments of 60 - 80 cm.
It is possible to sheathe a small house and a veranda from corrugated board in the country house, which can be used as a protective material or as the wall itself.
 The veranda is made of a profile pipe and sheathed with corrugated board
 Decking must be fastened to a wooden, and preferably to a metal crate. If the veranda crate is made of a metal profile, then you need to fasten the corrugated board to it using metal screws with thermal washers on the cap, but first you need to treat the crate with an anti-corrosion compound.
A good extension to a wooden house can not only increase its useful area, but also emphasize style and originality.
Wooden houses continue to be popular even now. Wood can compete with the most modern building materials without being inferior to them.
We will build
Sometimes, over time, a home needs expansion. Someone does not have enough living space or, in connection with the addition to the family, they need another bedroom, a nursery or a bathroom, someone wants an open summer veranda with a transparent roof, and someone needs access to the garage directly from the living room.
Everyone's desires are different, but all of them can be realized equally easily. The extension of a room, veranda or garage is done in almost the same way - it is not difficult to build it with your own hands.
Despite the fact that the house itself is wooden, construction can be carried out with any material. Whatever material is chosen for the construction of the extension, the work begins with the project.
The project is needed to take into account all the nuances on paper and avoid mistakes in the work.
It is necessary to sketch a plan on a scale, calculate the consumption of materials. You can make several options, and then choose the best one.
When drawing up a project, all building codes and regulations must be observed, since finished projects must be coordinated in the BTI and in the housing sector.
If it is impossible to draw up a project and draw a plan on your own, then you can turn to specialists for help.
After the project is drawn up and approved, construction can begin. Law on this moment does not prohibit the start of construction even before the approval of the project, however, if errors or violations are found in the project building codes, then the owner may be required to demolish the unauthorized structure.
When adding non-capital structures- open verandas, terraces - the project does not have to be coordinated, this applies only to capital structures.
Finally, the papers are finished and the project is signed. The first step is to inspect the wall to which the building will adjoin, and the adjacent part of the foundation.
If something needs to be strengthened or patched up, then this must be done before the start of the main construction.
If you plan to attach a full-fledged room, then the decoration and plaster from the wall must be removed.
In the case of an extension of a garage or terrace, this can also be done, but not necessarily. When an entrance from the house is provided for the extension, it must also be cut through before construction begins.
This must be done correctly so as not to damage the strength of the wall and not weaken it.

The basis of the future is, of course, the foundation. The quality and durability of the structure depends on it.
Laying the foundation of an extension is the same as laying the foundation for a separate building.
But there is one subtlety here: it is important to correctly attach the new foundation to the foundation of the old house.
Both parts must be one monolithic structure. If this is not achieved, then the difference in the base will crack the walls, and after a few years the extension may collapse.
Therefore, when starting construction, it is very important to pay due attention to the bonding of the foundation.
To do this, you need to completely free the foundation from the finish and dig it to the full depth.
After that, it is necessary to drill holes in the foundation with a diameter of at least 10 centimeters and a depth of about half a meter.
These holes should be located at a distance of 40 - 50 centimeters from each other. In addition to these connecting holes, it is necessary to drill holes for the fittings.
The reinforcing wire inserted into them must be welded to the frame of the future foundation. Before pouring concrete, the foundation of the old house is thoroughly wetted with water - this will ensure the best quality of binding.

After the mortar dries and the fences are removed, the new foundation will be tightly tied to the old one. On it you can create any desired extension with your own hands.
What material can be used to make an extension?
Without a doubt, wood is best combined with wood. But, despite the fact that the house is wooden, an extension to it can be made with your own hands from any material, and not just from a wooden beam.
There is only one detail that needs to be given due attention when building with your own hands - the extension must have a permanent connection with the old house.
This single requirement can be met with any material. With some materials, work will be easier, with others - a little more difficult. Here you need to choose what will be more convenient to work with.
You can consider the following options:
- building from a wooden beam;
- brickwork;
- frame extension;
- construction from foam blocks;
- aerated concrete and other materials.
The construction of a veranda, terrace, summer kitchen is easiest to carry out using a frame structure.
The frame extension is being built a little faster than other projects, but they are practically not inferior in quality.
The frame of the extension itself can be assembled both from wood and from metal. Its reliable connection with the old building seems to be the simplest.
The frame beams are connected to the load-bearing wall of the house with bolts or long self-tapping screws. Between themselves, the parts of the metal frame are welded. If the frame is wooden, then it is fastened with self-tapping screws.

After assembling the frame, it is insulated with glass wool, polystyrene foam or foam plastic. The insulation can be placed in several layers, as it must fill the entire area of \u200b\u200bthe frame. Joints can be fastened with construction tape or other means.
After insulation, the frame building is sheathed with any chosen material. Outside, it is good to use siding, lining or other finishing materials.
Usually, the same materials that were used in the main construction are used to finish the extension.
However, when building a frame-based veranda, the materials may be different to emphasize the individuality of the structure.
Inside, drywall, plywood or other options are used for sheathing.
The roof of the veranda can be made of roofing translucent polycarbonate, but if the room is capital, then the new roof should be connected with the old one.
The roof can be both gable and single-pitched, the main thing is that the connection is securely sealed.
The roof is covered with metal tiles, slate or any other roofing materials, except, perhaps, corrugated board. Decking is a rather cold material, moreover, it practically does not isolate sounds.
A photo: 
The connection of buildings from a wooden beam is made using a channel. The size of the channel must be selected based on the size of the timber used - so that it enters the channel tightly enough.
First, the channel is fixed to the walls of the house with bolts, and only then a new beam is attached to them.
For this, you can use self-tapping screws. To protect against rust, metal channels are primed. The joints between the timber and the metal are sealed with a polyurethane-based sealant.
Do-it-yourself extension of a veranda made of wooden beams is a fairly reliable structure. If the insulation of the walls from the timber is carried out correctly, then the room can be used all year round.
A bit about blocks and bricks
If the construction is carried out from brick, foam blocks or aerated concrete, then the connection can be made with steel reinforcement. Metal rods must be cut into pieces of at least a meter in advance.
After laying out a number of blocks, the reinforcement is hammered into the logs of the old house so that its free half falls strictly into the seam between the rows of material.
After the construction of the walls is completed, the gap between the old and new walls must be properly sealed.
A brick extension to a wooden house is strong and durable. The laying of load-bearing walls should be carried out in at least three bricks. In the case of an extension of the veranda, the walls can be laid out in one and a half bricks.
Since brick is colder than wood, such an extension must be properly insulated.
To insulate the extension with your own hands, you can use the following materials:
- Styrofoam;
- polystyrene;
- glass wool.
If the extension is made of foam blocks or aerated concrete, then they do not need additional insulation.
Buildings made of aerated concrete, foam blocks and other blocks based on foamed concrete are themselves quite warm due to the air contained in the pores of the material.
A significant disadvantage of such blocks is that they all absorb water to a greater or lesser extent. Therefore, saving on external waterproofing of a building made of foam blocks is not worth it.
What blocks are best to make an extension? If we compare between aerated concrete and foam blocks, then although they look similar, they have different qualities.
A photo: 
Aerated concrete blocks are much stronger than foam blocks and practically do not shrink. The structure of foam blocks can shrink up to three millimeters per meter.
However, the absorption capacity of aerated concrete is much higher than that of foam blocks, so due attention should be paid to their waterproofing.
On the other hand, a building made of foam blocks and any other concrete blocks also needs to be waterproofed, so the question remains open.
Everyone has the right to decide for himself. Foam blocks are somewhat cheaper than aerated concrete blocks, which can play a decisive role in the choice of material.
One of the advantages of private households is the ability, if necessary, to increase the usable area by adding an additional one to the main structure. Thus, residential or utility rooms are obtained, for whom what functionality was not enough. In order for the extension to improve the living conditions of the owners, and not organize problems for them, it must be built according to existing technologies, and not according to the principle "somehow, if only it would be cheaper." Therefore, we will figure out how to properly settle down to the house, based on generally accepted methods and experience of FORUMHOUSE users.
- Foundation for extensions
- Wall materials
- Wall bonding methods
- How to make a roof
- Outbuilding functionality
- Registration of outbuildings
Foundation for extensions
There are two types of foundation for an extension - a rigid hitch and expansion joint.
rigid hitch
Such a connection is designed for non-rocky soil and is justified when erecting a heavy structure of two or more floors, but only if the main building has already settled down and the village. The new foundation must be of the same type as the main one (tape, slab) and match in depth, taking into account possible shrinkage. A bunch of tapes is made by means of reinforcement, for which the foundation of the house is dug out to the full depth; in the working area, too much exposure is fraught with deformation.
Holes for reinforcement are drilled in a checkerboard pattern in the foundation web, on the basis that their length is 35 times the diameter of the rod, and the length of the reinforcement itself is twice as large as the depth of the holes. The reinforcement is driven into the holes, in the future the protruding part will be filled with concrete, a common monolith will be obtained. A bunch of plates is possible with a thickness of more than 40 cm and the presence of a protrusion of the main plate of 30 cm; for coupling, the reinforcement is beaten off and welded to the reinforcing cage of the new plate.
To perform a rigid hitch, it must be borne in mind that the flooded one, connected to the main one, must settle, ideally within a year. If it is not possible to withstand such a period, it is better to use another method.
Expansion joint
The most common type of bond is when a completely independent one is poured near the old foundation. Optimal for heaving soils for lightweight structures, the thickness of the seam is from 2 to 5 cm. In order to aesthetically connect the foundations, and
the seam at the junction remained the same along the entire length; boards pre-wrapped with polyethylene or roofing felt are used. Since the load on the base will be less, the drawdown will also be less, and the seam will allow the extension to “play” as planned without affecting the integrity of the house.

During the construction process, the joint between the walls is filled with insulation, and the seam itself is subsequently sealed with elastic means or closed with special flashings. One of the users found an interesting solution - stainless steel overlays, between which there is a layer of corrugated rubber.

zhp FORUMHOUSE user
In principle, you can buy such a “closing” for an expansion joint, immediately insulate the distance between the walls normally, close it from the street with a “closing”, and if over time there is shrinkage, compression or stretching, the “closing” compensates for this moment. And in order to return the rubber to its previous shape, it will be possible to unscrew the screws from the left side and drill again, in new places in the bricks.
Since the foundations are not interconnected, any type can be chosen for the extension, based on the characteristics of the soil and the expected load. It can be slab (monolith or UWB), tape (MZF or to the freezing depth) or columnar (pile).

Portal users prefer joining foundations through expansion joints, as the most justified and safe way.
mfcn Member FORUMHOUSE
Whatever good (non-rocky) soil, if it is not a rock, then you should expect shrinkage of the foundation of the extension in relation to the main house. Accordingly, measures must be taken to ensure that these shrinkages are non-destructive to the structure and provide acceptable functional properties of the structure. Hence: annex - in fact new house next to the old or light structure, the walking of which is permissible, and violations of the horizontal floor and jamming of the doors are permissible.
materials
Modern market building materials offers a wide selection for every taste and budget. Extensions made of foam concrete, aerated concrete, cinder block and similar large-format masonry varieties and frame structures are most in demand today. Frames are in the lead due to the speed of construction, relative accessibility and simplicity; in terms of energy efficiency, they are not inferior to stone buildings due to the use of heaters.

However, if possible, it is recommended to choose a material similar to the main one: a wooden extension to a wooden house, etc. This is especially true for houses that are not supposed to be sewn up with the same facade as the extension. If you plan to use siding or similar cladding, the choice is not limited.
Wall tie options
An extension to the house can have four walls or three, then the role of the fourth plays outer wall Houses. Four walls are relevant in extensions made of masonry materials, a bunch of walls is not required, and compliance with the masonry level gives an even seam. The presence of a layer of insulation between the walls allows the use of thinner blocks for the adjoining wall. In frame construction, sliding ligaments are used: two vertical beams are stuffed onto the wall, between which a vertical extension beam is inserted.

Connecting beams in the annex
When the extension is assembled from profiled or glued timber or logs, the walls are connected to the house either with metal brackets or with special galvanized corners with a shelf of 63 mm or more.
The corners are planted on self-tapping screws, leaving a small gap for shrinkage. The seam in both cases is closed with a flashing or platband. Also, the joining of the beams in the extension is carried out by means of a tenon-groove system, the grooves are selected in the load-bearing wall, the tenon is cut on the built-in segments.
Roof device methods
The extension is brought under a common roof, when a rigid connection is made, if an expansion joint is selected, it is easier to cover the building separately, sealing the junction. Depending on the roofing material, the seam is closed with a stainless steel apron, 30 cm wide or with a special decorative element.

Rigid connection to the house from a bar.
mfcn
The shrinkage of the extension in relation to the main house imposes certain restrictions on the arrangement of the roof. Therefore, in practice, making an extension with a roof such as a continuation of the existing one should be deliberate and reasonable.
Functional
As with the construction of a house, before erecting an extension, it is necessary to determine in advance the functionality, since different purposes require appropriate construction manipulations. If it is supposed to make living rooms, enhanced insulation is necessary. For the boiler room, bathroom or kitchen, communications are immediately laid. It's easier to change your mind and plug a couple of plastic pipes into the wall than to decide that another bathroom is needed and gouge a freshly built one.

Legalization of the extension
Before building a major extension, a permit must be obtained. Within the city limits, this is done by the Department of Architecture and Urban Planning, in rural settlements- administration. You can build without papers, but then when you try to sell, bequeath or donate a house with an extension, you still have to draw up documents, but it’s more difficult, through the courts. In the event of a confrontation with the neighbors, they can sue the self-builder and insist on the demolition.
For anyone planning an extension, it is useful to study the topic on the forum. The user experience of our portal in the topic is also interesting. The article will help determine the type of foundation for the future design. And our video will teach you how to work with aerated concrete.
-
 April 17, 2015The most expensive banknotes of modern Russia
 -
 April 17, 2015What is KBK in details and where to get it?
 -
 April 17, 2015Budget classification code: how to find out?


